NOTE the below is based on that you have successfully completed Starting QBOI for the first time
If you have not, go back and do so FIRST.
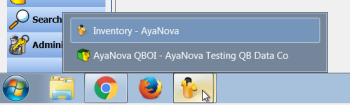
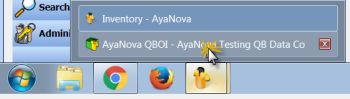
1. Your QBOI Main may already be running - hover your mouse over your AyaNova icon on your Windows task bar like that shown in the example screenshots below and select QBOI if listed as already running
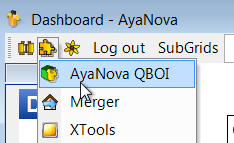
2. Or if not running, start AyaNova QBOI from within the AyaNova desktop program from the Plug-Ins menu at the very top
3.a If your computer is still authenticated with your QB Online
•have not exited or logged out of AyaNova since the last time you authenticated with your QB Online;
•your computer has not been idle for a length of time which can as a result disconnect your Intuit connection;
•QB Online has not lost its connection to your computer
then you will be presented as per below - select to run QBOI Main
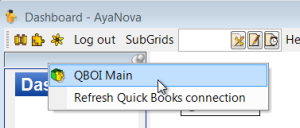
It is always suggested to Refresh your QB connection, especially if anyone else is working in either AyaNova or QB at the same time as you are, and/or if you have made any edits in either.
Now proceed with editing your Preferences if needed, mapping/linking if needed, importing if needed, editing your Descriptive Text if needed, and/or invoicing if needed.
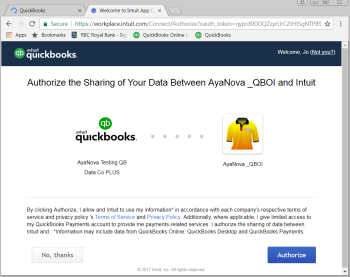
3.b Whereas if your authentication has been lost, you will be asked again to authorize sharing of your data between AyaNova_QBOI and your QB Online data.
This is for your security and required by Intuit (QB Online).
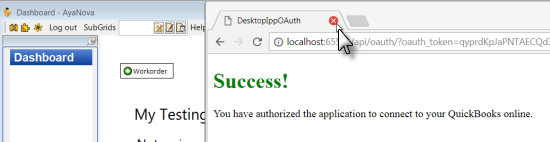
3.b.1. Your default web browser will launch a window to trigger the authorization process of allowing your desktop QBOI to communication with QuickBooks Online. A temporary connection is made to our web server to trigger the start of authentication with Intuit.
[Note that it is done this way due to a requirement with Intuit's oAuth 2 authentication process requiring a web server be involved in the process; we do not track your usage and no private data is stored on our web server, it only acts as a temporary intermediary to start the authentication process and the actual data flow is handled securely by QBOI directly from your desktop to QuickBooks online.]
Don't worry, please be patient - there may be a slight delay depending on QB Online itself - could be even as much as 2 minutes.
Log in.
3.b.2. Click on Authorize to continue.
3.b.3. You can now close this tab/web page as QBOI is now authorized with a token and will communicate directly with QuickBooks online for this session from this point forward. This web page does not have to remain open it's purpose is completed. The authorization token will remain until you exit out of AyaNova itself (just exiting out of QBOI will not remove the token).
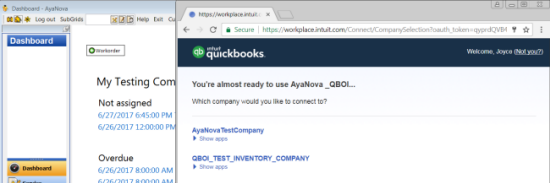
3.b.4. And again, if you have multiple QB Online databases, again you will need to select the same QB Online database you did with which you have already mapped/linked and imported data.
3.b.5. And again, is the name listed the correct QB Online database file you want to use with your AyaNova and QBOI?
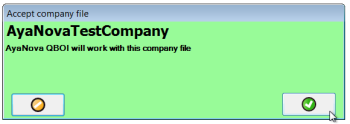
If yes, click on the green OK button to accept.
If this is not correct, click on the orange Cancel button to cancel.
Log out of the QB Online database file you were in.
Exit out of AyaNova, and start the process again, being sure to select the correct QB Online company file you want to interface with your AyaNova
3.b.6. Now select to run QBOI Main
Now proceed with what needed done - i.e. editing your Preferences if needed, with mapping/linking existing data if needed, importing your QB Online clients/items/vendors into AyaNova if needed, importing your AyaNova clients/vendors/parts/rates into your QB Online if needed, editing your Descriptive Text if needed, and/or invoicing if needed.