If this is the first time running QBOI on this computer, and/or if all steps below have not been completed successfully, follow below:
1. Confirm installation has been completed on this computer.
2. Log into AyaNova as a user that has at minimum Read/Write/Delete rights in their security group to the following:
•Object.Client
•Object.Part
•Object.Rate
•Object.Vendor
•Object.Workorder
•Object.WorkorderService
3. Log into your QB Online company database on this same computer
▪It is suggested that BEFORE running QBOI for the first time, that you have the following already created in your QB Online database (whether you will be importing AyaNova data to your QB Online or importing QB Online data to your AyaNova) so that when you set your Preferences, these objects are already there to select:
oYour QB Online Sales Tax Codes
▪depending on your country version of AyaNova, as may need to be selected when importing AyaNova clients and/or parts into your QB Online database
oA QB Online non-inventory item for AyaNova Loan charges
oA QB Online service for AyaNova Outside Service charges
oA QB Online non-inventory item for Misc Expenses
▪No worries if these were not set before the first time you loaded QBOI, as you can always go back and edit your Preferences with the correct QB Online selections you want to use after completing these initial steps that follow.
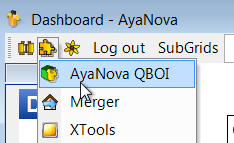
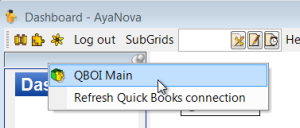
4. Start the QBOI program from within the AyaNova desktop program from the Plug-Ins menu at the very top
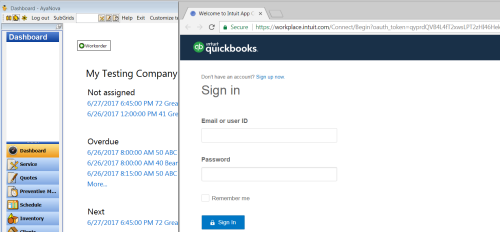
5.a Your default web browser will launch a window to trigger the authorization process of allowing your desktop QBOI to communication with QuickBooks Online. A temporary connection is made to our web server to trigger the start of authentication with Intuit.
[Note that it is done this way due to a requirement with Intuit's oAuth 2 authentication process requiring a web server be involved in the process; we do not track your usage and no private data is stored on our web server, it only acts as a temporary intermediary to start the authentication process and the actual data flow is handled securely by QBOI directly from your desktop to QuickBooks online.]
Don't worry, please be patient - there may be a slight delay depending on QB Online itself - could be even as much as 2 minutes.
Log in.
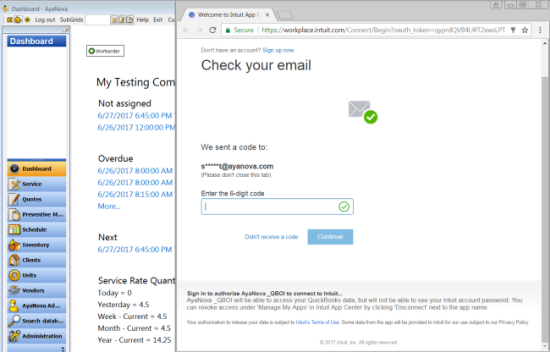
5.b If this is your first time logging in via AyaNova's QBOI, you will be asked to confirm this is OK by having a code sent to your email account from QB Online that you will input.
Then click to Continue, authorizing QBOI to access your QB Online data.
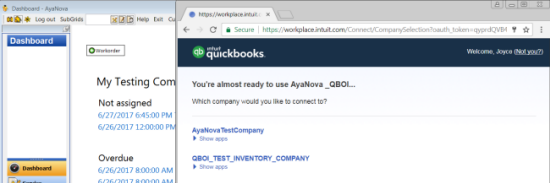
5.c If you have multiple QB Online databases, select the specific database that you will always be using with your AyaNova.
Attempting to use different QB Online databases with a single AyaNova database will lead to broken links between mapped data, issues with Preferences, and other possible issues.
Always select to use the same QB Online database.
QBOI will also have you reconfirm which QB Online database by its QB Online database name you gave it in QB Online too.
Example below of multiple database selection
6.a You will be asked to authorize sharing of your data between AyaNova_QBOI and Intuit
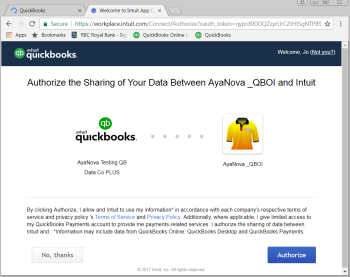
6.b Click on Authorize to continue.
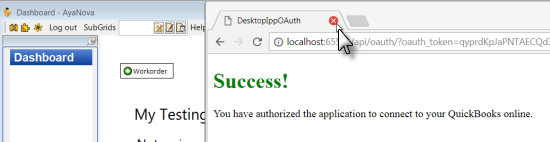
6.c You can now close this tab/web page as QBOI is now authorized with a token and will communicate directly with QuickBooks online for this session from this point forward. This web page does not have to remain open it's purpose is completed. The authorization token will remain until you exit out of AyaNova itself (just exiting out of QBOI will not remove the token).
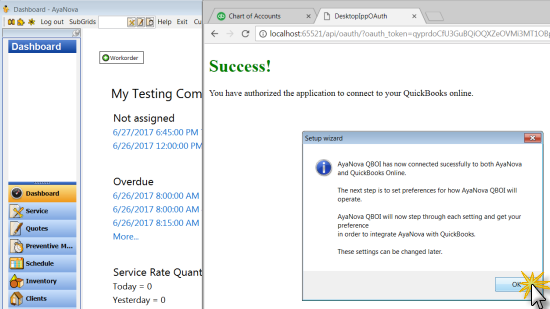
7. If this is the first time running QBOI after having authorized the connection, you will now be prompted by QBOI that the next step is to set up your QBOI Preferences.
Don't worry, you can always edit your Preferences again at a later time if you decide you instead want different AyaNova or QB Online items selected.
8. Is the name listed the correct QB Online database file you want to use with your AyaNova and QBOI?
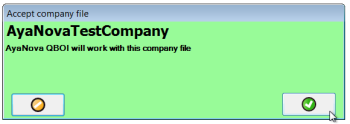
If this is the correct QB Online company database, click on the green OK button to accept.
If this is not correct, click on the orange Cancel button to cancel.
Log out of the QB Online database file you were in.
Exit out of AyaNova, and start the process again, being sure to select the correct QB Online company file you want to interface with your AyaNova
9. Now Preferences will be set.
The first will be to set the AyaNova Workorder Status of the billable workorder.
QBOI displays workorders that are ready for billing based on a number of factors - one being this specific Workorder Status set here.
If you do not presently have an AyaNova Workorder Status set up that you want to use for this, just select any status for now. As after you have completed these initial Preferences settings and setup, you can at any time afterward go into your AyaNova, create a new Workorder Status, refresh your QB Online connection and then edit your QBOI Preferences again.
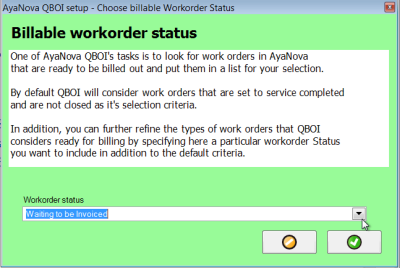
<note that AyaNova Workorder Status selected in screenshot above is only an example, select what YOU want to use>
10. As the information on the window states, the next Preference to set will be the AyaNova Workorder Status you want the workorder to be set to once invoiced.
Doing so will allow you to easily filter workorders in your AyaNova as to which have already been invoiced through your QBOI.
If you do not presently have an AyaNova Workorder Status set up that you want to use for this, just select any status for now. As after you have completed these initial Preferences settings and setup, you can at any time afterward go into your AyaNova, create a new Workorder Status, refresh your QB Online connection and then edit your QBOI Preferences again.
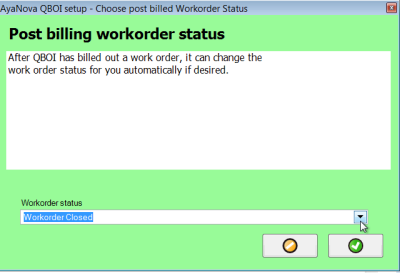
<note that AyaNova Workorder Status selected in screenshot above is only an example, select what YOU want to use>
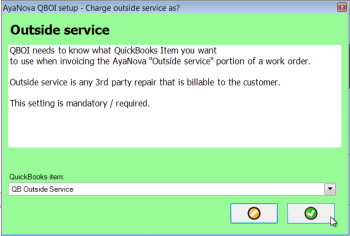
11. As the information on the window states, the next Preference to set will be the QB Online item to use when billing Outside Service.
This is a mandatory and required selection - you MUST select a QB Online item.
If you do not presently have a QB Online item set up for charging Outside Service, just select any item for now. As after you have completed these initial Preferences settings and setup, you can afterward in your QB Online company, create a new specific item for this, refresh your QB Online connection and then edit your QBOI Preferences again.
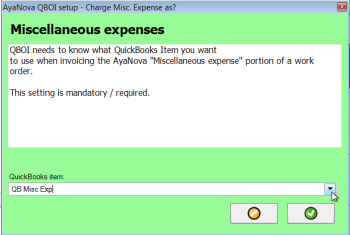
12. As the information on the window states, the next Preference to set will be to select the QB Online item to use when invoicing miscellaneous expenses in a service workorder item.
This is a mandatory and required selection - you MUST select a QB Online item.
If you do not presently have a QB Online item set up for charging Miscellaneous expenses, just select any item for now. As after you have completed these initial Preferences settings and setup, you can afterward in your QB Online company, create a new specific item for this, refresh your QB Online connection and then edit your QBOI Preferences again.
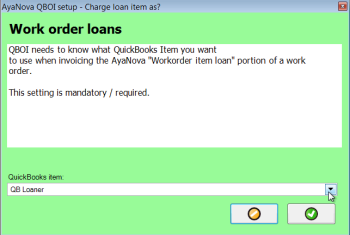
13. As the information on the window states, the next Preference to set will be to select the QB Online item to use when invoicing loan charges in a service workorder item.
This is a mandatory and required selection - you MUST select a QB Online item
If you do not presently have a QB Online item set up for charging for Workorder loans, just select any item for now. As after you have completed these initial Preferences settings and setup, you can afterward in your QB Online company, create a new specific item for this, refresh your QB Online connection and then edit your QBOI Preferences again.
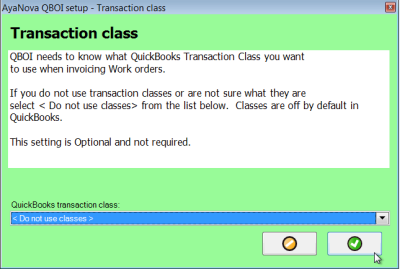
14. As the information on the window states, the next Preference to set will be to select the QB Online transaction class if used.
This is optional.
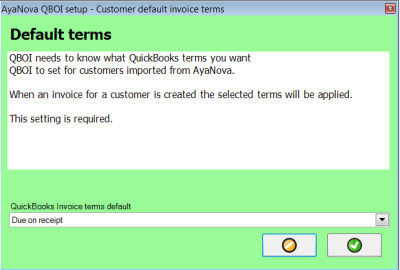
15. As the information on the window states, the next Preference to set will be to select the Default Terms you want QBOI to tell your QB Online data to set the imported customer record(s) to when imported from AyaNova to your QB Online data
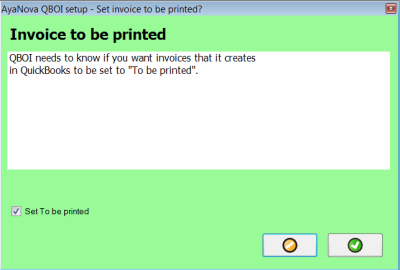
16. As the information on the window states, the next Preference to set will be either uncheck or leave check-marked the To Be Printed in a QuickBooks invoice that is created.
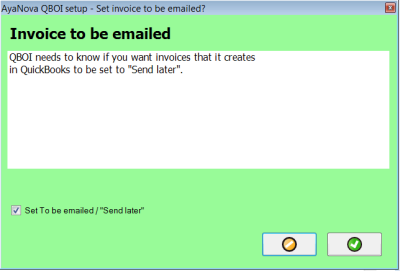
17. As the information on the window states, the next Preference to set will be either uncheck or leave check-marked to to have invoices generated to be checkmarked To be emailed/send later
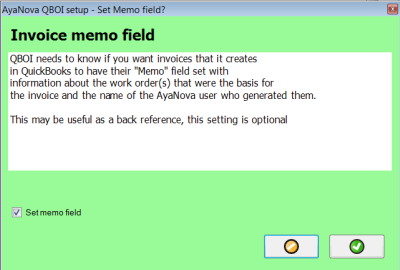
18. QB Online has two memo fields for an invoice:
1. The Customer Memo field which will show on the invoice that the customer sees.
2. And a private message field called the "Statement Memo" field where internal notes are not seen by the customer.
If this Preference is checkmarked:
1. The Customer Memo field will display the AyaNova workorder number that the billable items were generated from via QBOI
2. The private message field will display the name of the logged in AyaNova user and the date generated.
If this Preference is not checkmarked:
1. The Customer Memo field will not have any QBOI generated info added.
2. The private message field will not have any QBOI generated info added.
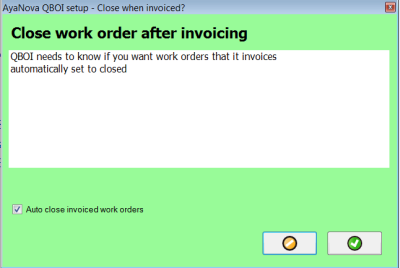
19. As the information in the window states, either un-check or leave check-marked to have the AyaNova workorder set to the Closed state once the workorder has been invoiced via QBI into QuickBooks.
An AyaNova service workorder set to the Closed state can not be edited further nor deleted.
For more information on the Closed state (and how to undo if needed), refer to your AyaNova online Help documentation regarding that specific section of the AyaNova workorder.
20. Now select to run QBOI Main
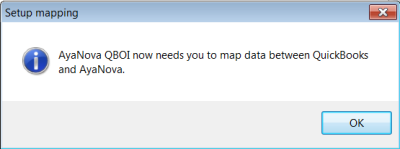
21. QBOI will now jump you to its Map & Import section so you can map (the words "map" and "link" are used interchangeably and are meant as the same) existing data between your QB Online and your AyaNova, and then import data from your QB Online to your AyaNova and/or AyaNova to your QB Online database.
Review about mapping (linking), how to manually map (link), how to automatically map (link) and more.
It is recommended that you first map (link) data that exists already in both your QB Online database and your AyaNova database before importing.
Review about importing your QB Online data into your AyaNova database, and how to.
Review about importing your AyaNova data into your QuickBooks database, and how to.