AyaNova report customization, examples, tutorials & FAQs


Report Customization FAQs

Your sample AyaNova database come with eighty-five example report templates that you can use as is or further customize or create new.

Report templates are not erased when you erase the sample data.

A few of the example report templates that come with your AyaNova 7 database are shown below:

Service Work order template
Example of dispatching template
Example of quote template
Example of inventory template
Example of Part inventory sticky labels template

Yes!

Refer to the many AyaNova Online Help tutorials that will walk you through creating new report templates.

To save yourself time, we recommend checking out the existing example report templates first - as there may be an existing example report template that meets your needs, or may need just a few tweaks to be what you need.

View each of the many grids in your installed AyaNova, droping down the Print menu option to see the sample report templates provided for each grid (as different data can be reported on depending on the grid).

Also check out the additional tutorials below and additional report templates below.

Yes! We can provide report template design customizations for you. Minimum fee is US$55. What your fee will be, depends on what is involved to do the customization.

Please email us at support@ayanova.com with the following so that we may provide you with an fee estimate and go from there:

  1. Confirm you are using the latest version of AyaNova by comparing your version from Help -> About AyaNova to the latest version listed on our Download page
  2. Identify which AyaNova grid / entry screen you want the custom report template available from (i.e. Service Workorders grid, Clients grid, Quote entry screen)
  3. If you have an existing custom report template that you would like further customized, attach to your email (see your Online Help documentation How to...? for exporting an existing report template). NOTE: If customizing an existing example report template, confirm you HAVE created a copy of the original and are sending/working with the created copy, not the original.
  4. Provide detailed information exactly what you want the report template to do, what it is doing instead, identify specific fields where you want data to display by their default label name from the AyaNova entry screen, what the issue is, if errors full text of the error, what was done in full before receiving the error, etc etc.
  5. Provide a mockup of what you want the report to look like - identifying what is preset text, what is data from what fields in what AyaNova entry screen, if fields are derived what AyaNova fields they are derived from, etc.
  6. If your report will use logos or images, be sure to provide attached to your email
  7. Any additional information you believe may be relevant that will help us understand how the report will look and act with actual AyaNova data and how it will react based on that AyaNova data.
  • Note:
    • If the customization or question(s) requires more than 10 minutes to answer (whether because of the expertise needed or because details requested above were not provided), be advised that fees will occur.
    • Total time is charged for - which includes obtaining details needed for how the report template is to look, what fields are to be included where, researching to determine if what you want a report to do is even possible, researching to see what specific C# scripts would be able to be used, etc - all of these take time that will be charged for - not just the final report template file.
    • If your question/customization would take more than 10 minutes, we will email you back with a general estimate range to confirm that you would like to proceed, and an URL to make initial payment and what that initial payment will cover.
    • No work will be performed until fees have been paid for that portion of research/customization.
    • If your report template requirements change (i.e. now want different field shown, or now want different fields to be added up, etc etc) this can have a impact on what has been done so far, and any previous payments/estimates may no longer be applicable as now the requirements have changed.

How to troubleshoot depends on the error message!

First, note the exact error message. If you get multiple error messages, note them in the order they appear.

  • If the error message is similar to:
      There are following errors in the scripts: line 501, column 3: error CS0103: The name 'NetTaxA' does not exist in the current context
    • Such error(s) may be due to someone in your company edited the sample report template, deleting fields that were on the Designer that is referenced elsewhere in Scripts, and/or editing existing Scripts.
    • Fix this issue by deleting this report template that gives the error, and import back into your AyaNova your backup of the report template made before it was edited.
  • If the error message is similar to:
      Could not load file or assembly 'DevExpress.XtraPrinting.v10.2, Version=1.12.5.0, Culture=neutral, PublicKeyToken=79868b8147b5eae4' or one of its dependencies. The located assembly's manifest definition does not match the assembly reference. (Exception from HRESULT: 0x80131040)
    • or
    • Parse Error, no assembly associated with Xml key a3:http://schemas.microsoft.com/clr/nsa...868b8147b5eae4 PageInfo
    • Such error(s) usually means that the report template in use is from an older version of AyaNova and not compatible with the version of AyaNova you presently have.
    • An example where this may occur: you had at some previous point, upgraded from an older version of AyaNova, which in addition to keeping your existing data also keeps your existing report templates, and this particular old report template is be incompatible with AyaNova 7.x
    • Fix this issue by deleting this report template that gives the error, and importing the replacement example report template from the appropriate zip file under Replacement Example Report Templates below.
    • NOTE: If the report template was a customized report template, you will need to create/customize again. If you would like help with this, please provide as outlined in the answer above to "I need a report template customized - can someone help?"
  • If the error message is similar to:
      There is no email program associated to perform the requested action. Please install an email program, or if one is already installed, create an associated in the Default Programs control panel
    • This message may occur when you attempt to email a report from the Preview window in your AyaNova desktop program.
    • Fix this issue by setting your installed email program as the default app for email.
    • NOTE: Emailing from the Preview window feature requires an installed email program. Email via your web browser or via Microsoft Live Mail are incompatible with the ability to email a report from the Preview window in your AyaNova.
  • If the message is similar to:
      Selected report can not be imported. There is already a report with the same internal ID value in your database.
    • This message may occur when you attempt to import a report template into your AyaNova database.
    • As the message says, the report template you are attempting to import already exists in your database.
    • The report template that is already in your database may or may not have the same name, but it has the same internal ID so AyaNova won't allow you to import and overwrite the existing. Most likely because an original sample report template was renamed instead of a copy made from the original.
    • Fix this by identifying the existing report template (would be located in same Key location as the report template you are attempting to import - i.e. WorkorderServiceDetailed) and delete it. Once deleted, than you can import the report template.

Simply drag and drop from the dataset showing in your FieldList tab in your Report Template Designer onto your design!

The Online Help documentation section How do I... add additional datafields to a report template? provides step by step tutorial for you to follow along.


Or if the datafield you require is not preset available in the accompanying dataset for that report template, you can add any AyaNova data field using the AyaNova API methods from the code behind reports in the report editor.

See further below for examples of using API Methods with report template customization.


Report Template Tutorials & How To's

Follow along with our step by step tutorial walking you through creating a new Detailed type report template for access from the Service Workorders grid and from the Service Workorder entry screen.

  1. Download the zip file TUTORIALAyaNova7DetailedWOReport.zip
  2. Extract to a location on your computer
  3. View the PDF file, following along with the step by step instructions to familirize yourself with creating an indepth Detailed type report template with multiple subdatasets.

2 ways this could be done.


1. Don't have anything set in the report template itself. If there is no specific grouping/sorting settings in the report template, the sort order that data that will display in a report will be based on the sort of records displayed in that grid itself.

  • An example of this:
    1. View the Parts Inventory grid in your AyaNova desktop Inventory navigation pane
    2. Drag the Part column so that it is the first column on the left. Note that now the sort order of the records displaying in the grid are based on the part.
    3. Select the grid menu Print, and select the "Sample Inventory Reconciliation Form"
    4. The Preview will display the report data in the same sort order you have displayed in your Inventory grid, because there is no over-riding sorting/grouping set in the report template itself.


2. Within the report template itself, group and sort based on a specific datafield that you set in the report template's groupheader band. We have provided two examples below.
  • First example of this:
    1. Again view the Parts Inventory grid in your AyaNova desktop Inventory navigation pane
    2. If not yet, set the sort order to be by the Part column by dragging the column Part to be the left most column, and than clicking on the Ascending/Descending object on that column. You will see that all records displaying in the grid are sorted by this firstleft most column
    3. Select the grid menu Print, hold your SHIFT key while selecting the "Sample Inventory Reconciliation Form" report. This will open this report template in the Report Template Designer.
    4. Do not edit the sample report directly, instead select File -> Save As -> edit so is the new report name is "My Company Inventory Reconciliation Form"
    5. Now that we are working with a copy of the sample, now we can edit so that this report now groups and sorts by the Part Warehouse!
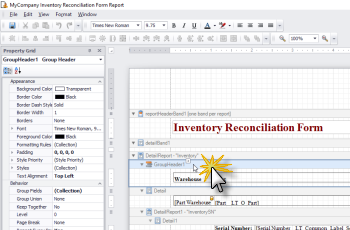
    6. Click on the GroupHeader1 band (which highlights that band, so you know it is selected. And on the left you can see the GroupHeader1 is showing as selected for the Property Grid)
    7. GroupHeader band
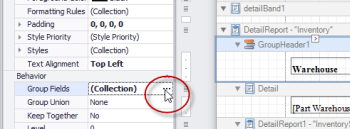
    8. Select Browse... for the Group Fields property for this GroupHeader1 band
    9. Browse Group Fields
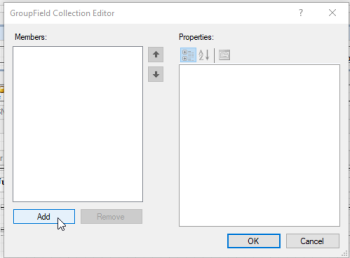
    10. In the GroupField Collection Editor screen that displays when you click on ..., select Add on the left
    11. Add GroupField to sort by
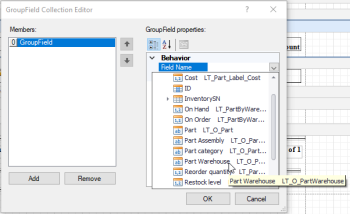
    12. In the GroupField Properties that now display on the right of the GroupField Collection Editor, drop down the FieldName and scroll till you find and select Part Warehouse
    13. Select specific datafield to group by
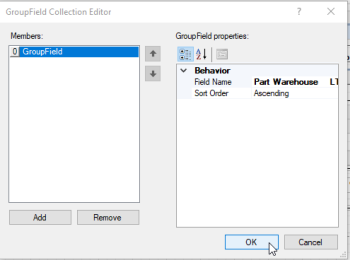
    14. Click on OK to apply.
    15. Add GroupField to sort by
    16. (NOTE: Descending or Ascending determines the sort order - i.e. a to z, or z to a)
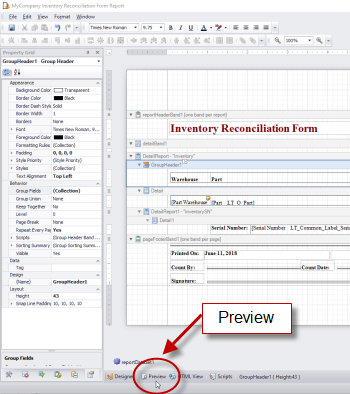
    17. Now preview your report template.
    18. Add GroupField to sort by
    19. You will see that this customized report template now sorts by Part Warehouse, regardless how your sort order is set in the grid itself.


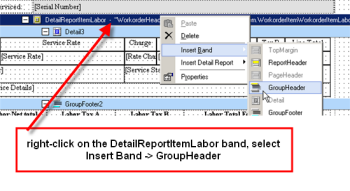
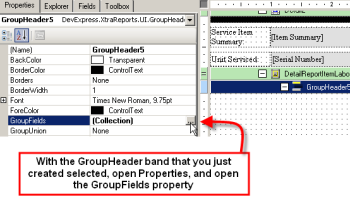
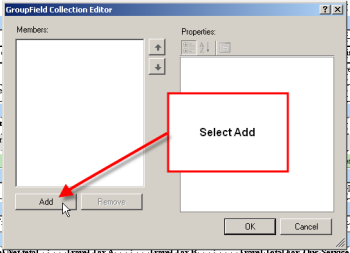
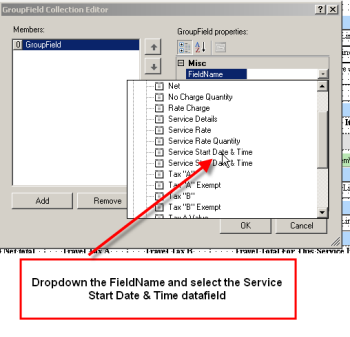
  • Second example - getting labor entries to display based on the Service Start Date & Time:
    1. View the Service Workorders grid in your Service navigation pane.
    2. Select the grid menu Print, hold your SHIFT key while selecting the "Sample Detailed Service Workorder with Grand Total" report. This will open this report template in the Report Template Designer.
    3. Do not edit the sample report directly, instead select File -> Save As -> edit so is the new report name is "My Company Detailed Service Workorder with Grand Total"
    4. Now that we are working with a copy of the sample, now we can edit so that this report now displays labor based on the Service Start Date/Time!
    5. insert GroupHeader band
    6. open the GroupFields property
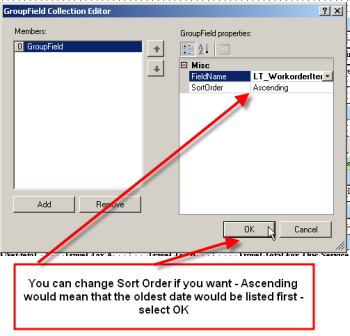
    7. Add
    8. find the Service Start Date/Time
    9. ascending or descending
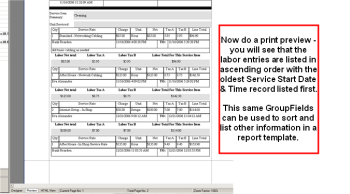
    10. preview to see the sort


The Detailed Workorder Report Tutorial also provides how to in step 13 on using the GroupFields property of a GroupHeader band.

Also check out examples of this grouping using a GroupHeader band in many of the sample report templates included in your AyaNova such as the "Sample Total Billable Grouped By Client Report" from the Service Workorders grid, such as the "Sample Scheduleable User Billing Hours Report with Grand Total Report" from the Scheduled Users grid in the Service navigation pane, and the "Sample Purchase Orders Summary Report" from the Purchase Orders grid in the Inventory navigation pane.

Depending on what needed, you may be able to use the automated summary settings in the report template's Report Designer OR you can use scripts!


Follow along with the Online Help documentation section How do I ...caculate an automatic summary in a report template?


Or display by using scripts in your report template!

For example, the datafield Line Total automatically determines the final price that is based on ((Price - Discount) x Quantity). But you may have an internal need to display total cost (cost x quantity) or display total price before discount as well as the Line Total.

The example report template "Sample Quote with Costs and With No Discount compared against Discounted Parts" found in your Quotes grid uses scripts to manually multiple part cost by the quantity to display your Net Cost amount, and manually multiples the part price by the quantity to display the Before Discount price.

Line Total is automatically derived by AyaNova, applying any discounts (or markups).

Refer to this report template example when creating or customizing your own.

  • 1. Open the example report template "Sample Quote with Costs and With No Discount compared against Discounted Parts" found in your Quotes grid with your Report Template Designer (hold SHIFT key while clicking on the report template in your Print menu option).
  • 2. Find the field xrTableCell101 in the Designer tab (the field colored yellow in the Detail3 band)
  • 3. The field xrTableCell101 uses the following BeforePrint script to the get and display the cost of the part, as well as keeps a running total to display in the reort footer:
    • private void xrTableCell101_BeforePrint(object sender, System.Drawing.Printing.PrintEventArgs e)
    • {
    • //this gets the value of the original COST of the part and multiples it by the quantity to display in this field what the Net
    • //COST amount would be
    • xrTableCell101.Text = string.Format("{0:c2}", (Convert.ToDouble(DetailReportItemPart.GetCurrentColumnValue("LT_WorkorderItemPart_Label_Cost"))) * (Convert.ToDouble(DetailReportItemPart.GetCurrentColumnValue("LT_WorkorderItemPart_Label_Quantity"))));
    • //this keeps a running total of the net price with no markup for display in the groupfooter
    • TotalNetPartCost += Convert.ToDecimal((Convert.ToDouble(DetailReportItemPart.GetCurrentColumnValue("LT_WorkorderItemPart_Label_Cost"))) * (Convert.ToDouble(DetailReportItemPart.GetCurrentColumnValue("LT_WorkorderItemPart_Label_Quantity"))));
    • }
  • 4. And the field xrTableCell98 uses a BeforePrint script to get the value of the original price of the part multipled by the quantity to display what the Net amount would be without any discount/markup.

Scripts allow you to specifically manipulate data displayed!


NOTE: Entering a decimal number into the Discount field results in a discount - i.e. entering 0.20 applies a 20% discount. Alternatively, entering a negative decimal amount results in a markup - i.e. entering -0.20 applies a 20% markup.

Let's say that you commonly have workorders that span multiple pages when previewed/printed.

To make it easier for you, your staff and your clients to see at a glance what pages goes with what workorder or quote, have the "header" information display on each page - such as the client name, workorder number, service date, etc.

By setting properties of the topmost GroupHeader and the ReportFooter, you can have the header of your report repeat every page!

  1. Open the example report template "Sample Banked Detailed Service Workorder with Grand Total Repeats Report" from the Service Workorders grid in your report Template Designer (hold your SHIFT key while selecting the report template, which will open it in your Report Designer).
  2. Do not edit the sample report directly, instead select File -> Save As -> edit so is the new report name is "My Company Banked Detailed Service Workorder with Grand Total Repeats Report"
  3. Click on the GroupHeader6 band (which highlights that band, so you know it is selected. And on the left you can see the GroupHeader6 is showing as selected for the Property Grid)
  4. On the left in the Property Grid for this GroupHeader6 band, you will see the property Page Break is set to Before the Band
  5. And in the Property Grid for this GroupHeader6 band, you will see the property Repeat Every Page is set to Yes
  6. Click on the ReportFooter1 band (which highlights that band, so you know it is selected. And on the left you can see the ReportFooter1 is showing as selected for the Property Grid)
  7. On the left in the Property Grid for this ReportFooter1 band, you will see the property Page Break is set to After the Band

These work even when printing multiple workorders at one time from the Service Workorders grid or the Items grid.

By editing the properties of your report template!
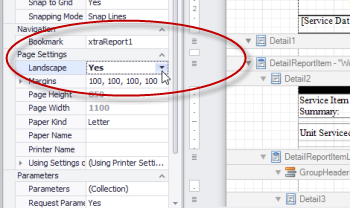
  • Edit the report template's Landscape property to Yes.
    1. Open the report template in your Report Template Designer (i.e. hold your SHIFT key while using your mouse to click on the report listed under your menu Print)
    2. Click anywhere outside of the report, so that your Property Grid shows xtraReport1 Report
    3. Scroll down through the properties for the xtraReport1 until you find Landscape
    4. Select the property Landscape changing it from No to Yes
    5. Your Designer panel will now show the report template expanded lengthwise to Landscape.
    6. Edit page settings

Note that the property PageKind refers to the "kind of paper" used - such as "Letter" for normal North American printers, "A4" for European, etc.

This can occur when your report template's datafield has not specifically been set to format for a number AND your AyaNova database uses SQL (Express or Server).

No worries, it's an easy customization!

Do either for the following:
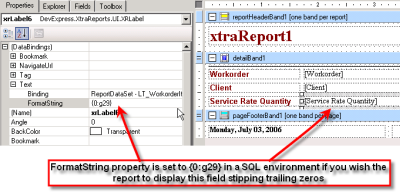
  • Customization #1 - edit the StringFormat property:
    1. Format the number data field to strip the zero's by typing in {0:g29} in the FormatString property for the data field
    2. preview to see the sort
  •  

  • Customization #2 - edit the StringFormat property:
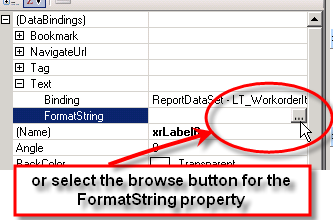
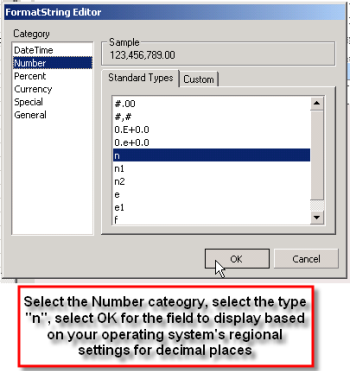
    1. Format the number data field to use your operating systems Regional settings for numbers digits after decimal by selecting to use the Standard Type n in the FormatString. (i.e if your regional settings is set to display 2 digits after the decimal, setting this will set the data number field to display showing 2 digits even if a whole number - 1.50 for example).
    2. preview to see the sort
    3. preview to see the sort

We provide a number of example report templates where you can see this done with datafields, automatic summary, and/or scripts.

  • Take a look at the Sample Scheduleable User Billing Hours Report with Grand Total Report from the Labor grid in the Service navigation pane in your AyaNova.
  • This report template has been designed to display a total of no charge hours + billable hours for the schedulable user(s) records displayed in this grid.
  • These totals are achieved by maintaining a running total of all no charge hours and all billable hours for the schedulable user and displaying that total under Total NC & Billable Hours
  • Follow along by selecting the properties where indicated so that you can see how done.
    • Open up in your Report Template Designer your report template Sample Scheduleable User Billing Hours Report with Grand Total Report from the Labor grid in the Service navigation pane in your AyaNova
    • First was created the variables where the running totals will be kept.
    • create the variables
    • Then we added a OnBeforePrint script to the detailBand1
    • OnBeforePrint script
    • Then in the detailBand1 OnBeforePrint script property we wrote C# code to maintain a running total of billable hours and of no charge (NC) hours into that NCBillTotal variable.
    • script to maintain running totals
    • We added an OnBeforePrint script for the GroupFooter's xrTableCell8 field, and in its OnBeforePrint script, we wrote C# code to displays this total
    • script to display the total
    • And we added an OnAfterPrint script for the GroupFooter band, where we wrote C# code that resets the NCBillTotal back to 0 (zero) otherwise the running total would continue adding onto other schedulable users totals.
    • reset back to 0


    Also check out many other sample report templates that show use of automatic summary and use of scripts - have included a few more listed below:
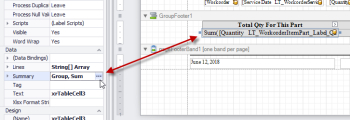
    • Example of using Group, Sum for the Total Qty of a specific part, and Total Net for a specific part can be found in the Sample Parts in Service Workorders Report accessible from your Parts grid in the Service navigation pane.
    • automatic summary example
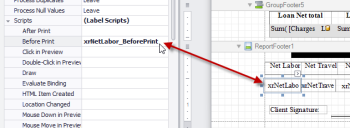
    • Example of using scripts to display the Net of all Labor, of all Parts, of all Travel, of all Taxes etc and of the Grand Total can be found in the Sample Detailed Service Workorder with Grand Total Report accessible from your Parts grid in the Service navigation pane
    • use scripts to display running total
    • display running total using script

3 ways to do this, depending if a Detailed type report template, Summary type report template, whether the datafield is a Custom field, and sometimes when setting the FormatString property in a Detailed report template does not result in what you wish.


1. With no formating set in the report template itself, the report template will use your computer's date/time display.


2. If a Detailed type report template (difference between a Summary type and a Detailed type report template), set the FormatString property for that date/time field.
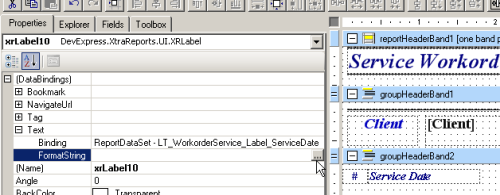
FormatString to set your date/time field format


3. If a Summary type report template, and/or when the datafield is a Custom field, and/or when setting just the FormatString property in a Detailed report template does not result in what you wish, use OnBeforePrint scripts in combination with setting the FormatString property.
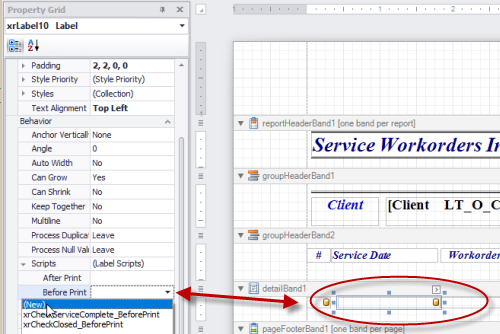
  • 1. Open the example report template Sample Service Workorders Invoiced from the Service grid in the Service navigation pane via your Report Template Designer (hold SHIFT key while clicking on the report template in your Print menu option).
  • 2. Do not edit the sample report directly, instead select File -> Save As -> edit so is the new report name is "My Company Service Workorders Invoiced"
  • 3. Click on the Service Date datafield (xrLabel10 in the detailBand1 band) in the designer panel to select it, and select the Properties tab (which will show the Properties for this datafield you just clicked on)
  • 4. Expand the Scripts property and select (New) to open your script editor for the OnBeforePrint for this datafield
  • FormatString to set your date/time field format

  • 5. Copy all text below and paste into the OnBeforeScript editor between the { } for the OnBeforePrint for that field and select OK to save:
    • //This code takes a summary report date field which is not a DateTime object
    • //converts it to a DateTime object, then sets the label control's text to
    • //the format selected in the databinding.FormatString property of the control
    •  
    • //Get a reference to the label on the report
    • XRLabel lbl = sender as XRLabel;
    • //If it's empty then no need to format it
    • if(lbl.Text=="") return;
    • //It's not empty, so parse it's text into a DateTime object
    • //Create a datetime object to hold the date
    • DateTime dt = new DateTime();
    • //First try to parse it using the current thread's locale setting:
    • //if that fails to parse then try the invariant culture format
    • if (!DateTime.TryParse(lbl.Text, out dt))
    • if (!DateTime.TryParse(lbl.Text, System.Globalization.CultureInfo.InvariantCulture. DateTimeFormat, System.Globalization.DateTimeStyles.None, out dt))
    • {
    • //if the code makes it to here then the date/time was not recognized
    • //and the code can not proceed. An alternative to this is to simply return
    • //without changing the lbl.Text by commenting out the following line
    • //this will ensure that *something* is printed even if not formatted
    • lbl.Text="Unrecognized date";
    • return;
    • }
    • //At this point we have a recognized date object and can format it as desired
    • //using a date format string in the ToString method of the date time object.
    • //To see other examples of date format string codes check this out:
    • //http://msdn.microsoft.com/en-us/library/az4se3k1.aspx
    • lbl.Text=dt.ToString("dddd, dd MMMM yyyy HH:mm:ss");


    6. Note the last line of the code - that is where you dictate how you want your date string to show.

    So for example, if you want only the date and no time, then the last line could be lbl.Text=dt.ToString("dddd, dd MMMM yyyy");

    Or to force showing what is set in the FormatString property for this datafield (where wasn't before), then the last line could be lbl.Text=string.Format(lbl.DataBindings[0].FormatString,dt);

    7. Preview your customized report template to see in action (and to confirm no problems with your code before you save and exit out of the Report Designer)


Replacement Example Report Templates

How do I get a copy of an original sample report template?

If you have deleted an example report template, or have a corrupted example report template, or need a replacement of the original for any reason, no worries! We have provided zip files of the original example report templates zipped below.

  1. Download the appropriate zip file below
  2. Once downloaded, extract the zip file to a temporary location on your computer. In addition to the *.ayr file(s), extraction may include folders for ease in finding the specific report template desired.
  3. Then follow the Online Help documentation steps for importing an *.ayr AyaNova report template into your AyaNova database.
  • If when attempting to import you receive the message:
      Selected report can not be imported. There is alredy a report with the same internal ID value in your database.
    • This message may occur when you attempt to import a report template into your AyaNova database.
    • As the message says, the report template you are attempting to import already exists in your database.
    • The report template that is already in your database may or may not have the same name, but it has the same internal ID so AyaNova won't allow you to import and overwrite the existing. Most likely because an original sample report template was renamed instead of a copy made from the original.
    • Fix this by identifying the existing report template (would be located in same Key location as the report template you are attempting to import - i.e. WorkorderServiceDetailed) and delete it. Once deleted, than you can import the report template.


Additional Report Templates Examples

Here is an example of a report template from the Parts grid in the Service navigation pane that will provide a list of parts used in workorders without showing duplicates.

Download the zipped file Whichpartsandhowmanysoldreport.zip, extract to a temporary location on your computer, and import into your AyaNova.

This report may be useful if you want to print out a list of parts actually used, so that you can "clean up" your inventory and delete or set to inactive the parts not used. Feel free to make a copy and customize further!
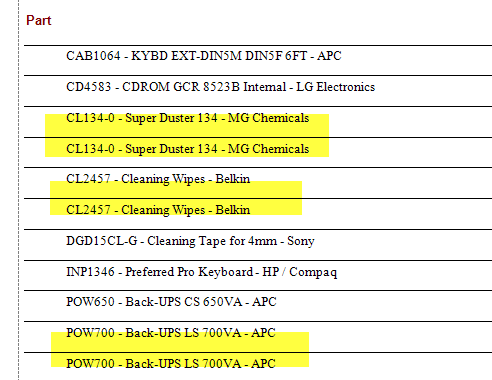
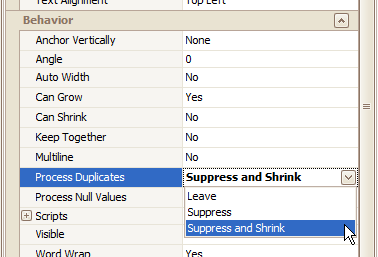
  • These were the steps used to create this example report template:
    1. When you sort the Parts grid in the Service navigation pane by the Part column you can easily see that yes, you do have the same part listed multiple times, as is used in different workorders.
    2. Created a new summary report template from the Parts grid in the Service navigation pane.
    3. Used the Report Template Wizard to create a new report template selecting the part datafield.
    4. Inserted a GroupHeader band.
    5. Dragged the label for part to its area.
    6. Edited the Text property so it was just labeled Part.
    7. If you were to Preview right now, you WOULD see duplicates listed.
    8. duplicates show
    9. To NOT see duplicates, continue.
    10. Click on the part datafield to select it, and edit its Behaviour property Process Duplicates to Suppress and Shrink.
    11. suppress and shrink
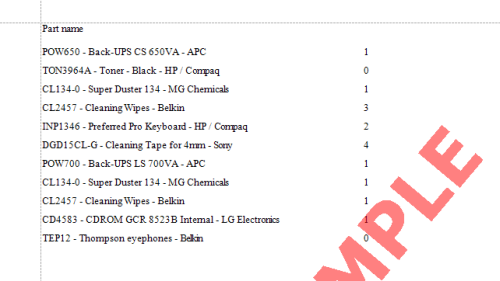
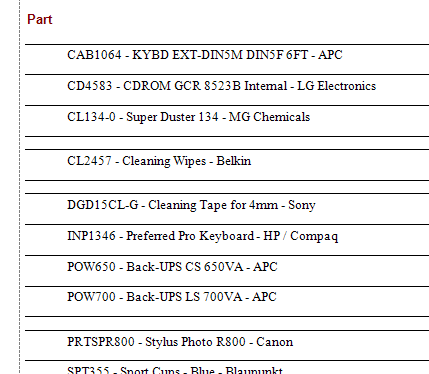
    12. Now when you preview, the part is listed only once.
    13. part shows only once
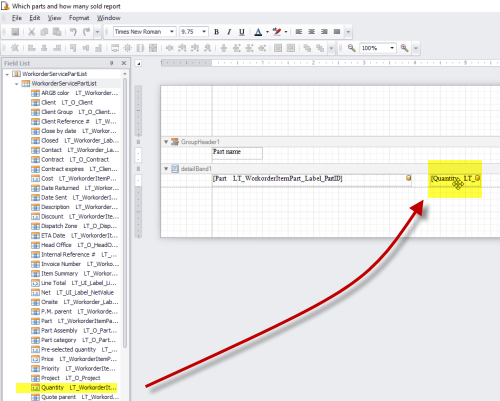
    14. Additionally, drag the Quantity datafield from the Field List placing beside the Part datafield in the detailBand1. When you preview, you will see that the report will automatically sum the quantity for each part!.
    15. dra.
    16. part shows only once.

This report template will display labor cost for all workorders you have displaying in your Service Workorders or Item grid (as you can filter to only show specific workorders based on many different columns (service date, client, etc)).

Download the zipped file SampleLaborCostforDisplayedWorkorders.zip, extract to a temporary location on your computer, and import into your AyaNova. Feel free to make a copy and customize further!
Note the following in this report template (see yourself by opening in your Report Template Designer).

  • ReportHeader band has a OnBeforePrint script to identify the item we will use in this report template:
  • decimal TotalNetCost = 0;
  • The GroupHeader band is above the Workorder Header band, as this is a detailed report template, but we are only displaying information from the Labor band. So in the Labor band, the field xrNetCost has an OnBeforePrint script of:
  • private void OnBeforePrint(object sender, System.Drawing.Printing.PrintEventArgs e)
  • {
  • //this displays the Cost multiplied by the Service Rate Quantity
  • if(DetailReport1.GetCurrentColumnValue("LT_Rate_Label_Cost") != System.DBNull.Value)
  • {
  • xrNetCost.Text = string.Format("{0:c2}", (Convert.ToDouble(DetailReport1.GetCurrentColumnValue("LT_Rate_Label_Cost"))) * (Convert.ToDouble(DetailReport1.GetCurrentColumnValue("LT_WorkorderItemLabor_Label_ServiceRateQuantity"))));
  • ///this keeps a running total of the net cost for display in the groupfooter
  • TotalNetCost += Convert.ToDecimal((Convert.ToDouble(DetailReport1.GetCurrentColumnValue("LT_Rate_Label_Cost"))) * (Convert.ToDouble(DetailReport1.GetCurrentColumnValue("LT_WorkorderItemLabor_Label_ServiceRateQuantity"))));
  • }
  • }
  • In the GroupFooter for this report, the field xrTotalCost has an OnBeforePrint script of:
  • private void OnBeforePrint(object sender, System.Drawing.Printing.PrintEventArgs e)
  • {
  • //this displays the running total of all Net Cost displayed
  • xrTotalCost.Text = string.Format("{0:c2}", TotalNetCost);
  • }

Both of these sample report templates once imported, would be available from the Parts grid in the Inventory navigation pane.

These report templates are based on the assumption that your Part record has Custom fields enabled, specifically Custom0 and Custom1 both set to display as Money.


Data you enter into a Custom field whether a date, money, number or text, is saved to your database as a string, so that if you change the Type of custom field (i.e. Money, Text, Date/Time, True/False) from one format (i.e. Money) to another (i.e. Text) the data in the field is still available.

Because the datafield is itself a string, regardless of how you have set to display in your AyaNova program itself, formating of Custom datafields in the Report Template Designer can not be set via the FormatString property of the field, instead Custom datafields formating require scripts.


Download the zipped file SampleReportCustomFieldToCurrencyBlanks.zip, extract to a temporary location on your computer, and import into your AyaNova.

This report template includes scripts to display a Custom Money datafield as currency in a report template, and also includes scripts to not display fields that have a price of $0.00. And Parts are displayed grouped by Category.

This report template was designed with these scripts so that the user can manually pencil in the amounts to enter at a later time on the printed copy.

When in the Report Designer of this report template, view the Scripts tab to see the scripts associated with the datafields linked to Custom0 and Custom1


Download the zipped file SampleReportCustomFieldToCurrencyBlanks.zip, extract to a temporary location on your computer, and import into your AyaNova.

This report template includes scripts to display a Custom Money datafield as currency in a report template, and also includes scripts to markup the Custom0 field, the Retail field and the Cost field by 10%.

When in the Report Designer of this report template, view the Scripts tab to see the scripts associated with the datafields linked to Custom0, the Retail field and the Cost field.

Feel free to download, import, refer to and customize further as needed.


Examples of using API Methods

As a developer you can use the same API that was used to develop AyaNova and all it's add-on programs at no cost be it for personal or in-house usage or to make applications that are sold for profit. There are no royalty fees or license fees of any kind to use the AyaNova business object library that comes already installed with AyaNova. In other words when you install AyaNova, you have already installed the API.

The API consists of a business object library that simplifies programming the objects in AyaNova such as Clients, Workorders, Scheduled technicians etc.

Every object in AyaNova has a corresponding business object that exposes simple methods to the programmer to create, retrieve, update or delete them.

The API would be referred to when creating custom scripts in your report template's Report Designer to bring in data that is not normally available in that report template's dataset.

The API could also be used for automating repetitive tasks, integration with 3rd party accounting or other software, generating work orders automatically based on events from system management software, etc. The possiblities are endless, anything you can do in the AyaNova program with a mouse and keyboardyou can write code to do automatically and much more.

The API docs contain a quick start guide and links to download sample source code and applications to get you going quickly. Note that it doesn't come with the API itself, you already have that installed on your computer when you installed AyaNova, or you can download the latest trial and work with that, either way it's there and ready to use.

Everything you need to get started can be found here: api.ayanova.com

Click on the Quick Start topic link on the upper left hand side to get started.
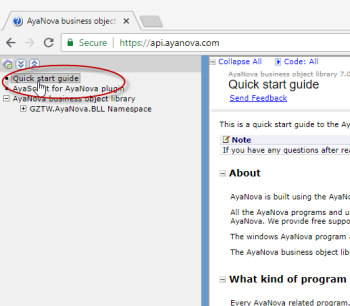
Quick Start for using the API

These API Method examples are meant for experienced developers.

If you do not have development experience, we are happy to provide you with a estimate to prepare a specific custom report that uses the API to obtain data not available through its datasets. Send as per I need a report template customized, can someone help?


This API example shows getting a list of all units tied to each client but from the Clients grid. Something you can not do without using the developers API as units are not part of the client report grids:
  • Download and import the sample report template APIreporttemplatefromClientsgriddisplayingUnitsownedbyclient.zip, extract to a temporary location on your computer, import into your AyaNova.
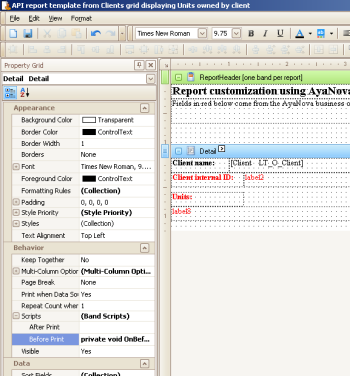
  • From the Clients grid, open this report template in the Report Template Designer
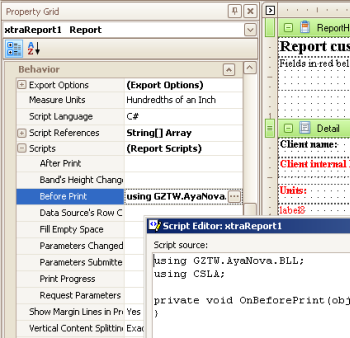
  • Select the Scripts tab to view the existing scripts.
  • You will note that the namespaces are declared. This will save time by not having to type the entire namespace in front of all AyaNova business object names.
  • using GZTW.AyaNova.BLL;
  • using CSLA;
  • declare namespaces
  • A BeforePrint script was created for the Detail band that will have the labels that will be displaying the data.
  • BeforePrint code
  • private void Detail_BeforePrint(object sender, System.Drawing.Printing.PrintEventArgs e)
  • {
  • label2.Text=Client.IDFromName(GetCurrentColumnValue("LT_O_Client").ToString()).ToString();
  • //Get the client's internal ID value from their name
  • Guid gClientID=Client.IDFromName(GetCurrentColumnValue("LT_O_Client").ToString());
  •  
  • //Prepare a stringbuilder to contain the list of units
  • System.Text.StringBuilder sbUnits = new System.Text.StringBuilder();
  •  
  • //Get a list of units this client owns
  • UnitPickList upl = UnitPickList.GetListByClient(gClientID);
  • if (upl.Count > 0)
  • {
  • foreach (UnitPickList.UnitPickListInfo i in upl)
  • {
  • sbUnits.Append(i.UnitName());
  • sbUnits.Append("\r\n");
  • }
  • }
  • else
  • sbUnits.Append("No units owned by this client");
  •  
  • label8.Text=sbUnits.ToString();
  • }
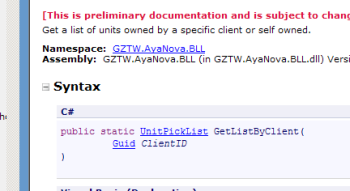
  • The above script uses API Methods - the Client's internal id in label2 (using the IDFromName method as shown in the API), then prepare a stringbuilder to hold the list of units (as some clients have more then one), and then use the UnitPickList method GetListByClient to get the list of units using the business object property.
  • API code Client's internal ID
  • API code GetListByClient
  • API code UnitPickList
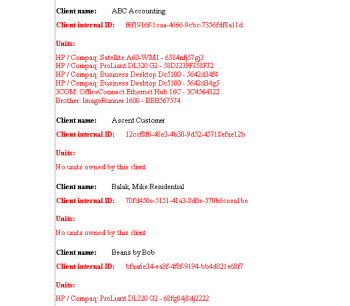
  • Example Preview below showing clients listed followed by all of its units.
  • Preview of report showing units of client report

Refer to the api.ayanova.com along with this and other API Method report template examples on the AyaNova Support Forum.

These API Method examples are meant for experienced developers.

If you do not have development experience, we are happy to provide you with a estimate to prepare a specific custom report that uses the API to obtain data not available through its datasets. Send as per I need a report template customized, can someone help?


This API example shows getting the Unit's Address fields to display in a report from the Service Workorders grid. Something you can not do without using the developers API as a unit's address fields are not part of the service workorder's dataset:
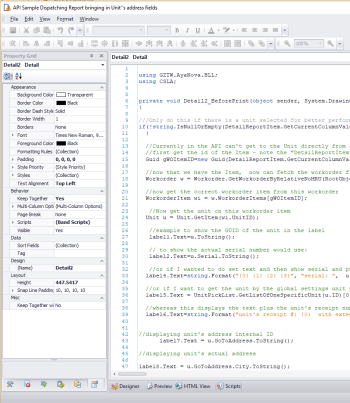
  • Download and import the sample report template APISampleDispatchingReportbringinginUnitaddressfields.zip, extract to a temporary location on your computer, import into your AyaNova.
  • From the Service Workorder grid, open this report template in your Report Template Designer
  • Select the Scripts tab to view the existing scripts that correspond to each label.
  • API code to bring in unit's address

Refer to the api.ayanova.com along with this and other API Method report template examples available on the AyaNova Support Forum.


Ground Zero Tech-Works Inc., Box 445 Horsefly, BC V0L 1L0 Canada
Since 1999 AyaNova® is a registered trademark of Ground Zero Tech-Works Inc. in the United States and other countries.
End User License Agreement | Privacy Policy