2 ways to import your AyaNova clients and/or parts into your QB Online database:
1. Can do so via QBOI Main.
2. Or you can import your AyaNova clients and/or parts into your QB Online database via the the AyaNova relevant grid or entry screen as outlined below
There is only 1 way to import AyaNova vendors and/or AyaNova rates:
1. Can do so via QBOI Main.
Import your AyaNova Parts into your QB Online database from your AyaNova Parts grid/ entry screen menu option
•Example of importing a single AyaNova part into your QB Online from your AyaNova parts grid
•Example of importing multiple AyaNova parts into your QB Online from your AyaNova parts grid
Import your AyaNova Clients into your QB Online database from your AyaNova Clients grid/ entry screen menu option
•Example of importing a single AyaNova client into your QB Online from the Client's record itself
•Example of importing AyaNova client(s) into your QB Online from your AyaNova Clients grid
Import your AyaNova Parts into your QB Online database using the QBOI quick menu options in the AyaNova Parts grid menu, and/or the Part's entry screen menu
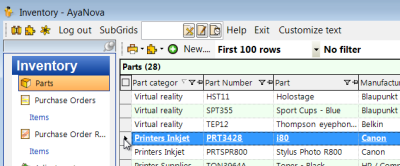
Below is an example of importing a single AyaNova part into QuickBooks Online from the AyaNova Part grid:
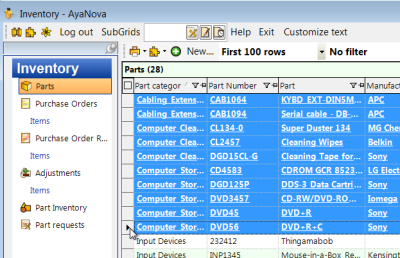
1. First select the part record you want to import by selecting its row selector ![]() .
.
You can tell the row is selected as in addition to the row being highlighted, also all fields are underlined.
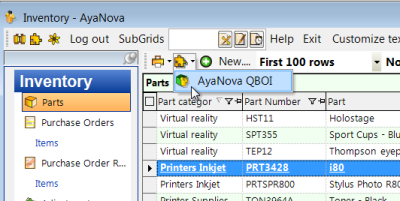
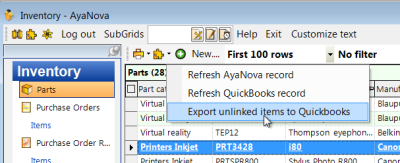
2. Select the PlugIns menu option in the Parts grid menu and select AyaNova QBOI -> Export unlinked items to QuickBooks
If the menu option Export item to QuickBooks is not listed, that means
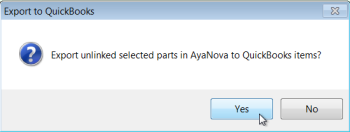
3. Select Yes to export
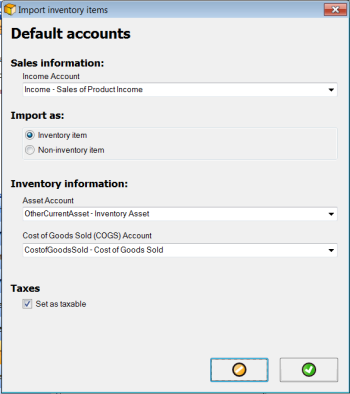
4. Select the QuickBooks Online COGS Account, Income Account and Asset Account for this part, and set whether taxable or not (or if non-US version of QB Online, select the specific Tax Code to use with with imported item in your QB Online)
Image below is for a US version of QB Online Plus with Inventory ability, whereas a non-US version of QB Online would have an actual QB Online Tax Code selectable under Taxes
NOTE: If the object(s) pre-selected in a grid are already linked via your QBOI (i.e. mapped or imported previously into your QB Online), or if you already have an Item in your QB Online database with the same Number you may receive a message stating so.
Refer to what the message states is the issue.
Also refer to Common Issues & Messages
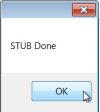
5. Confirmation the part has been imported into your QB Online will show as STUB Done. Click OK.
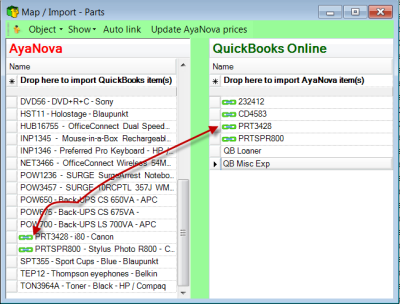
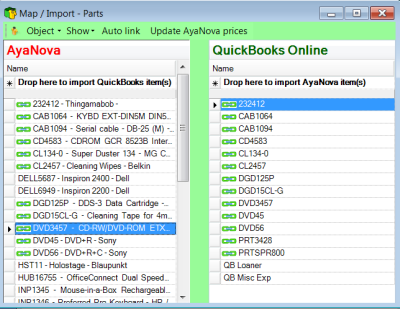
6. Via your QBOI Main, the part number now shows under QuickBooks Online as well shows as linked ![]() when view your QBOI Tools -> Map & Import -> Object -> Parts
when view your QBOI Tools -> Map & Import -> Object -> Parts
7. And in your refreshed QB Online, you can see that the Item with the available imported fields of data along with what the total of AyaNova On Hand amounts were at that time, and the total reorder amount.
Below is an example of importing multiple AyaNova parts into your QB Online from the AyaNova Parts grid:
1. Hold down the CTRL key on your keyboard for non-continuously listed part records when selecting,
or hold down the SHIFT key selecting the first part and then the last part record you want to import for continuous listed parts.
You can tell what records are selected as in addition to the row being highlighted, also all fields are underlined.
Then the exact same steps as above with importing a single AyaNova part into your QB Online would be followed - refer to above screenshots above for examples.
2. Select the PlugIns menu option in the Parts grid menu and select AyaNova QBOI -> Export unlinked items to QuickBooks
3. Select Yes to export
4. Select the QuickBooks Online COGS Account, Income Account and Asset Account for this part, and set whether taxable or not (or if non-US version of QB Online, select the specific Tax Code to use with with imported item in your QB Online)
NOTE: If the object(s) pre-selected in a grid are already linked via your QBOI (i.e. mapped or imported previously into your QB Online), or if you already have an Item in your QB Online database with the same Number you may receive a message stating so.
Refer to what the message states is the issue.
Also refer to Common Issues & Messages
5. Confirmation the part has been imported into your QB Online will show as STUB Done. Click OK.
6. Via your QBOI Main, the part number now shows under QuickBooks Online as well shows as linked ![]() when view your QBOI Tools -> Map & Import -> Object -> Parts
when view your QBOI Tools -> Map & Import -> Object -> Parts
7. And when viewed in your refreshed QB Online, you can see the Items with the available imported fields of data along with what their total of AyaNova On Hand amounts were at that time, and their total reorder amount.
Import your AyaNova Clients into your QB Online database via the Plugins quick menu options in the AyaNova Clients grid menu, and/or from the Client's entry screen Plugins menu
Below is an example of importing a single AyaNova client into QuickBooks Online from the AyaNova Client entry screen
1.a. If the AyaNova Client has not yet been linked or imported into your QB Online, your menu option under plugins for AyaNova QBOI will show Export to QuickBooks Online
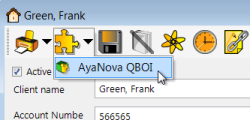
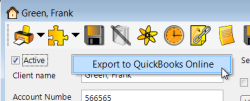
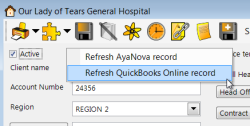
1.b. If the AyaNova Client already has been linked or imported into your QB Online, your menu option under plugins for AyaNova QBOI will show Refresh AyaNova record and Refresh QuickBooks Online record
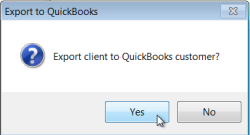
2. If the client is not yet imported and linked via your QBOI, click Yes to export
3. Select the Tax setting applicable to your country version of QB Online
i.e. if US version of QB Online
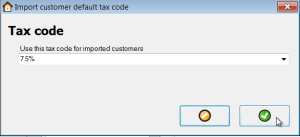
i.e. if taxble or not if non-US version of QB Online
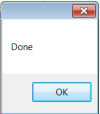
4. Confirmation the Client has been imported into your QB Online will show as Done. Click OK.
5. Via your QBOI Main, the part number now shows under QuickBooks Online as well shows as linked ![]() when view your QBOI Tools -> Map & Import -> Object -> Clients
when view your QBOI Tools -> Map & Import -> Object -> Clients
6. And in your refreshed QB Online, you can see the Customers with the available imported fields of data
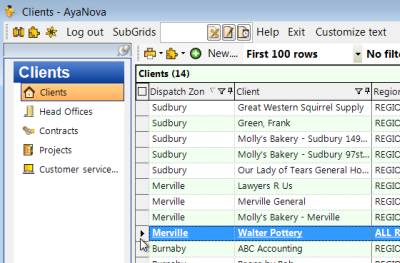
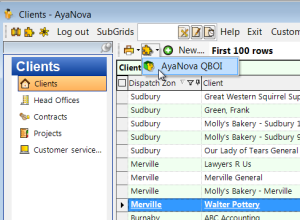
Below is an example of importing AyaNova client(s) into your QB Online from the AyaNova Client grid
1. To import multiple AyaNova clients that are listed continuously into your QB Online, hold down the SHIFT key selecting the first part and then the last part record you want to import.
To import multiple AyaNova clients that are listed non-continuously into your QB Online, hold down the CTRL key on your keyboard and select each client.
You can also select a single client as per the example below:
Note how you can tell what records(s) are selected as in addition to the rows being highlighted, also all fields are underlined.
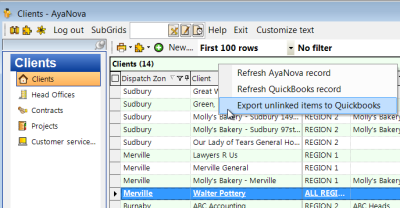
2. Select the PlugIns menu option in the Parts grid menu and select AyaNova QBOI -> Export unlinked items to QuickBooks
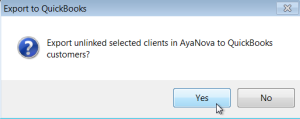
3. Select Yes to export
4. Select the Tax setting applicable to your country version of QB Online
i.e. Tax Account to use if using a US version of QB Online
i.e. Is Taxable or not if using a non-US version of QB Online
NOTE: If the object(s) pre-selected in a grid are already linked via your QBOI (i.e. mapped or imported previously into your QB Online), or if you already have a cusetomer in your QB Online database with the same name you may receive a message stating so.
Refer to what the message states is the issue.
Also refer to Common Issues & Messages
5. Confirmation the part has been imported into your QB Online will show as Done. Click OK.
6. Via your QBOI Main, the client name now shows under QuickBooks Online as well shows as linked ![]() when view your QBOI Tools -> Map & Import -> Object -> Clients
when view your QBOI Tools -> Map & Import -> Object -> Clients
7. And in your refreshed QB Online, you can see the Customers with the available imported fields of data