You can schedule a user for a new service workorder in the workorder entry screen itself, or even easier, do so via the graphical Schedule screen selecting the time range on a specific date.
In this tutorial example, we will go over the basic steps of scheduling for a service workorder item via the Schedule screen.
•It is highly recommended that you review this Online Help entire section on Service Workorders and Schedule Screen for complete overview, suggestions on use, tips on use and more.
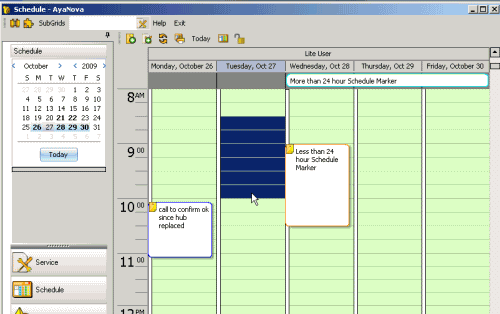
1.View the Schedule screen, and select a time frame that you wished scheduled.
•Using your mouse, click on the starting time and drag your mouse down to highlight the total time you wish to schedule this user (you can always edit the time if you need to later)
•In the example screen shot below we had clicked on the date Oct 27 to display the single day view for (All) users, and selected a start time of 8:30AM to 10:00AM - you can select whatever date and whatever time range you want.
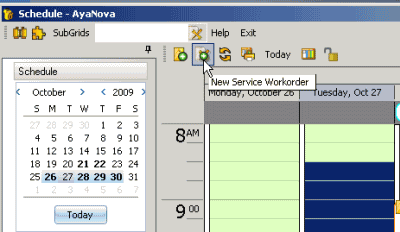
2.With that time selected for that date, click on the New Service Workorder button on the toolbar. If you do not select a date, or date and time frame prior to selecting, AyaNova will assume you mean today.
3.The Select Client screen displays.
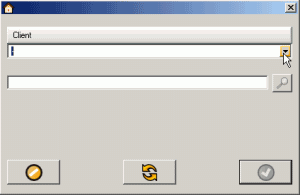
4.You can either use your mouse to drop down the list of clients and scroll to the client name or you can begin typing in the clients name to “jump” to that client in the list.
5.Type in the letter “m” (without the quotation marks) which will “jump” the selection to the client Merville General
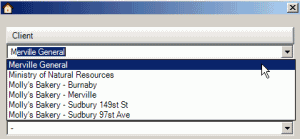
6.As this is the client we want, hit the ENTER key on your keyboard (or use the mouse to select the OK ![]() button)
button)
7.A new service workorder will appear for that selected client, with the selected time frame and date for that user in the Scheduled Users sub-section of the workorder item.
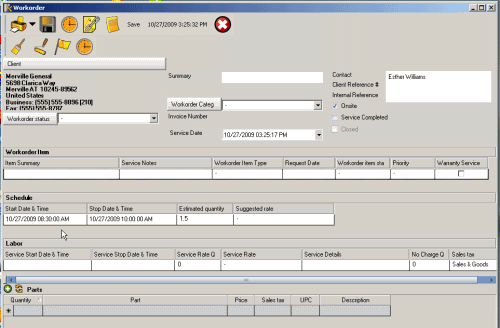
8.Enter in details of the workorder item such as entering a Workorder Summary and selecting Workorder Status; in the workorder item the Priority, Workorder Type and Workorder Item Summary and Service Notes; and in the Scheduled Users enter in the suggested rate (it will have pre-entered the Start and Stop Date for you and the Estimated Time)
As we won't cover all the fields and selections in the various areas of the service workorder in this tutorial, it is recommended that you do review the Service Workorder section of this Help file for information on suggested use for the fields Workorder Status, Summary, Service Notes, Priority, etc
•Service workorder header area
9.Save workorder by selecting ![]() from the menu bar at the top
from the menu bar at the top
10.Now that the workorder has been saved at least once, note the workorder number at the top of the workorder screen now
![]()
11.Close the workorder by selecting Save & Exit, or the X in the upper right hand corner of the workorder entry screen.
12.This returns you to the Schedule screen.
13.Select the Refresh menu option ![]() . (grids will automatically refresh every five minutes so if you have just made a change, use the Refresh button to see right away)
. (grids will automatically refresh every five minutes so if you have just made a change, use the Refresh button to see right away)
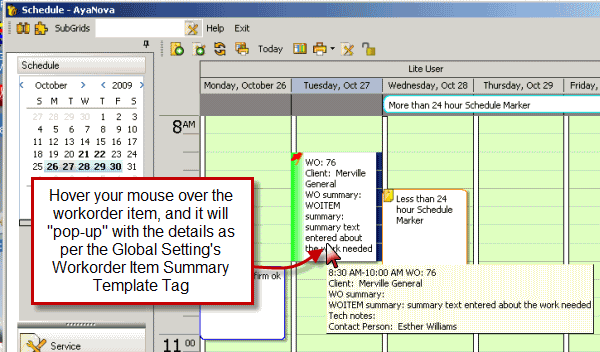
14. The workorder item now displays. Hover your mouse over and you can see what displays as a quick view.
See also:
How do I edit what pops up on Schedule screen for a workorder item?