Read through all instructions and notes first before proceeding.
2. Install the network Generator
3. Start and confirm Generator service loads successfully
4. Perform notification tests to confirm Generator is running
•that you have successfully installed AyaNova for network use on your server (i.e. network Firebird Server, or network SQL Express or network SQL Server)
•that the network Generator service is NOT installed on any other computer (it should only be installed ONCE on the server where the AyaNova database is networked)
•If installing on a 64bit computer, make sure QBI is NOT also installed on this same computer(server) as you will get an error when you run the Generator service.
2. Install the network Generator
a. On the server where you have the AyaNova database networked, run the AyaNovaSetup.exe installation again this time selecting the network administrator setup
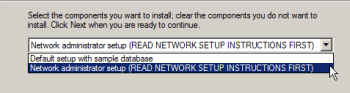
•As you will be selecting the Network administrator setup to install the network Generator, run the AyaNovaSetup.exe file from the same folder where you placed the copy of your networked edited config.txt file as per step #7 of your AyaNova networking steps - as it will expect to find a copy of the config.txt file in the same folder.
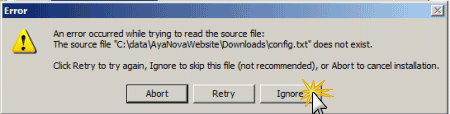
•If you run the AyaNovaSetup.exe file from a folder where a copy of your config.txt file is not located, you will get the following message. Just click on Ignore.
•Do NOT install the Generator to run on multiple computers - only on the server where the database is.
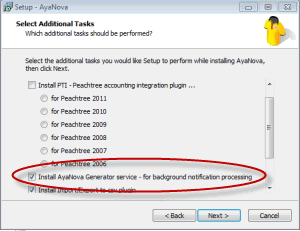
b. In the list of options, select to Install AyaNova Generator service - for background notification processing
![]()
c. Proceed with the installation.
d. If during the installation, it sees that there already is a config.txt file and will ask you if you want to overwrite it - click NO
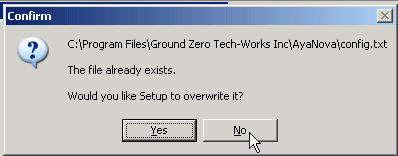
•You do NOT want to overwrite your config.txt file because it is already configured to point to your networked AyaNova database
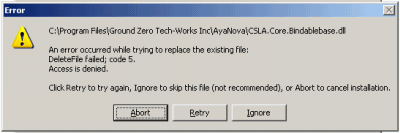
NOTE: if you get a message such as below about replacing a file, this is occurring because you have something running. Click Abort, and then check to make sure you do NOT have the AyaNova program running, nor QBI or PTI or any of the import/export utilities, and check IIS to make sure that the Default Web Site and AyaNovaDP (the data portal) is shut down while installing. Then run the installation again.
3. Start and confirm Generator service loads successfully
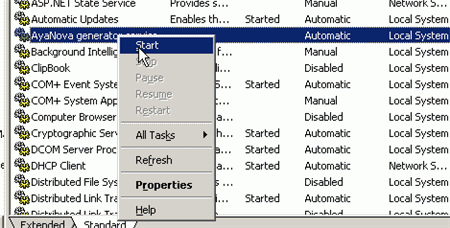
a. Once installation is completed, open Services (right-click on My Computer -> select Manage -> expand Services)
b. Find the AyaNova generator service – start it (right-click on AyaNova Generator and select Start)
•When the Generator service first starts, it will poll the database to process any notification events. Then it will poll every five minutes after.
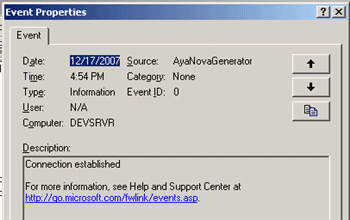
c. Check the Event Log for the AyaNova Generator and confirm it loaded and connected successfully
•Expand the Event Viewer in Computer Management window
•Double click on the Application Log
•Double-click on the last log entry for the source AyaNovaGenerator – it should say the service has connected successfully.
•If the service did not start successfully, check the other logs at that time to help identify the reason.
•Most common issue is that the config.txt in the AyaNova program directory is not correctly edited. Edit the config.txt file and confirm that it does have the correct database server, database, username and password, and that you can successfully run AyaNova program connecting to your networked AyaNova database.
d. Set the AyaNova Generator service to start automatically
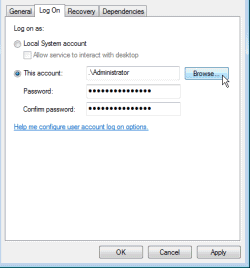
e. if this computer where the Generator service is now installed and running is logged out of on a regular basis (not running all the time logged in), you may want to/need to set the Logon properties of the service so that it can run while the computer itself is not logged on.
•Right-click on AyaNova generator service
•Select Properties
•Select the Logon tab
•Set a specific account that has full rights to computer
•
4. Perform notification tests to confirm Generator is running
Now perform the notification tests to confirm that your Generator is running correctly.
NOTE: Make sure that only one instance of Event Generator service is ever running for your database. Do NOT install the Generator to multiple computers - doing so will cause errors.
NOTE: You may need to create an exception with your firewall on the server for the generator.exe that runs