In this tutorial example, we will edit an existing sample report template so that it displays additional fields.
In the Sample Dispatching Report, in addition to the existing data that shows, we want the Other Contacts datafield from the Client's entry screen to show, and the Part Warehouse to show instead of the Serial Number, and we want to force the Price to always display in US dollars regardless of the regional settings of the computer in use.
•It is recommended that you review the Report Templates Help section before proceeding for an overview of the Report Designer.
•Do note that you can only have fields display in a report template if they are available from that report templates dataset - you can not add additional datafields to a dataset if they are not there. For example, you can not have additional fields from the Unit entry screen display on a report from the Service Workorders grid except for those that are in the Service Workorder report template dataset.
•It is suggested that you open up the existing sample report templates that come with AyaNova to see how they are designed, as well as check out the answers to questions about report template design in the AyaNova Support Forum and additional sample report templates there that you can download, use as is or customize further
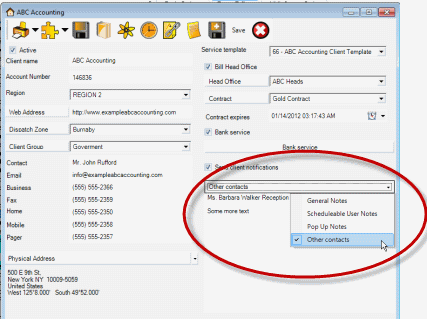
1.Confirm there is text in the Other Contacts field of the client am viewing.
a. View the client entry screen of a workorder by selecting the Client jump button
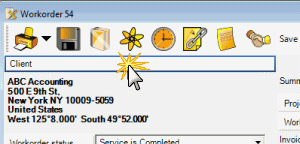
b. The client's entry screen opens
c. View the Other Contacts field - enter text if there is nothing yet there.
d. Save & Exit which will return you to the service workorder.
2.Now open the report template you customized in the previous tutorial the copy of the the Sample Dispatching Report - via the Report Designer (hold the SHIFT key and select the report template via the Print menu option)
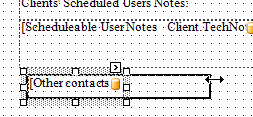
3.In this tutorial, we want to have the Other Contacts field from the Client entry screen display under the Schedulable User Notes on the report.
a.First we need to make more space in the WorkorderHeader detail area so that we can place the Other Contacts datafield
b. Adjust the height of the WorkorderHeader detail area by clicking and dragging on the bands - you will note that your mouse changes as you click and drag
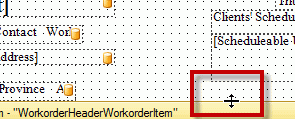
c.Now that we have space, we will drag the Other Contacts datafield onto the design panel where we want to place it.
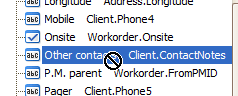
d.Select the Field List panel tab on the right and expand the WorkorderHeader dataset.

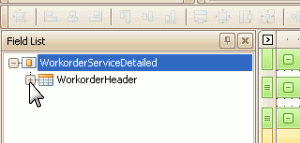
e.Scroll down, drag the Other Contacts datafield onto the design panel where you want to place it
f.Resize the datafield so that it is wider fits under the Scheduled User Notes
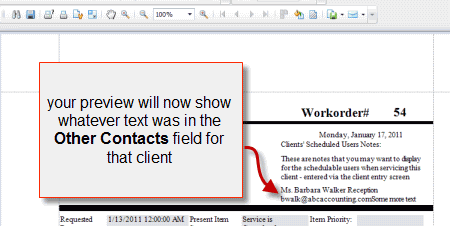
g.Preview so that you can now see how this field looks in the report
h.Return to the design panel
i.You can also adjust other properties of this label - such as Multi-line, font size, etc
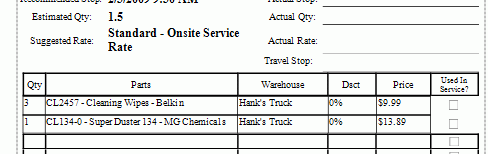
4.And also in this tutorial, we want to add the Part Warehouse to display in the part section of the report for each selected part instead of the Serial Number.
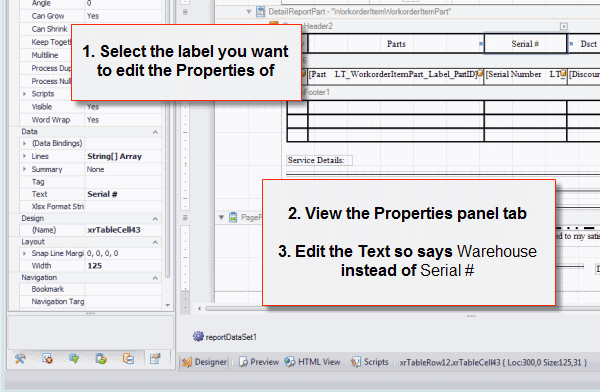
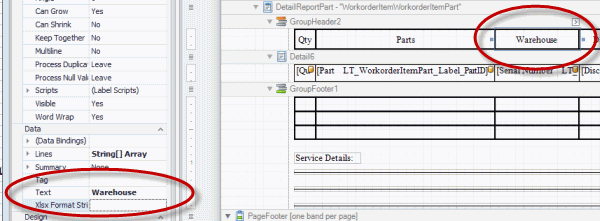
First let's edit the text label in the GroupHeader band where it presently labels Serial # to Warehouse.
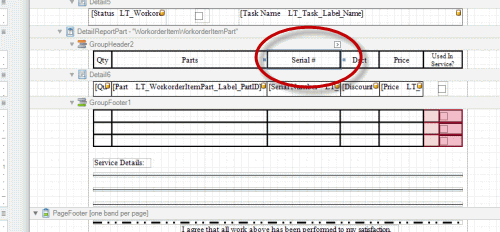
a.Click on the label itself, and view the Properties tab for it, and edit the Text property to say Warehouse instead of Serial #
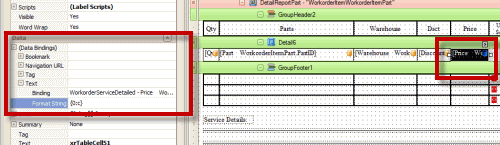
5.Now we will change the table field in the Detail band from being bound to the Serial Number datafield and bind it instead to the Part Warehouse datafield
a.Select the Serial Number datafield in the table in Detail6
b.View the Properties tab if not already showing
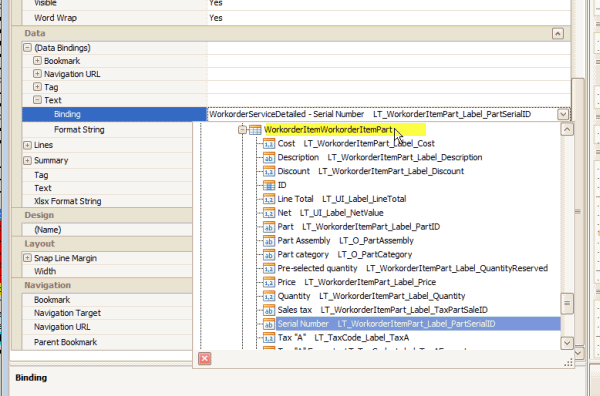
c.Expand the (Data Bindings) property, and the Text Binding property
d.Drop down the selection for this Binding, and select the Warehouse datafield
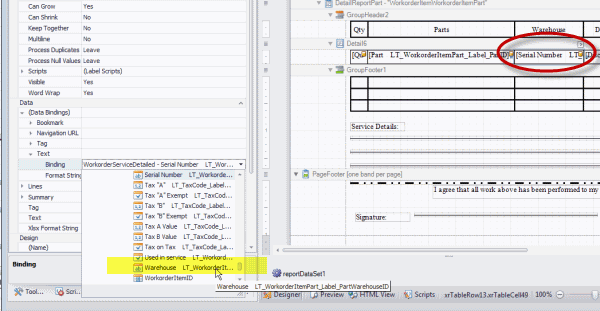
e.You will have noted when you dropped down the Binding, that the selection was already "within" the dataset for WorkorderItemWorkorderItemPart - same as where the DetailReportPart band on the design panel is bound to. You only want to select datafields specific to that bound dataset so that data displays correctly on your report.
f.If you Preview now, you will see that the part section of the report will now display the Warehouse the part was selected from instead of the serial number.
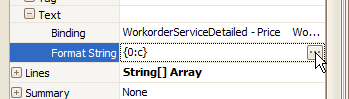
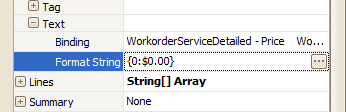
6.Now we want to check and see what the Price datafield is formated for showing.
a.Select the Price datafield, view the Properties tab for it, and expand the (DataBindings) property -> Text -> Format String
b.Right now the Format String is using the string {0:c} which tells the report template to use your computer's Regional settings to display the currency symbol
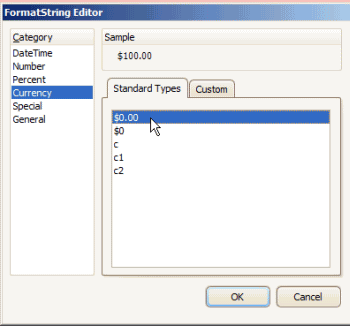
c.In this tutorial, we want it to be forced to always show as $ regardless of the regional settings of the computer accessing the data, so we click on it to bring up the FormatString editor and select $0.00
d.Preview
7.Save and exit out of the report template
8. Congratulations - you have completed adding additional datafield to an existing report template, and changing an existing field to be bound to a different datafield.