The steps below are for setting up multiple client hosting of AyaNova for SQL Server. Of course, some instructions may be different if using SQL Express.
NOTE: The information below is based on the assumption that you have already performed Set Up the Client's Database & Applications
1. Test connection to client's AyaNova database via local area network connection computer and internal IP address and port:
a. Move to the examples folder for the client's AyaNova program files
b. Rename the EXAMPLE_DATAPORTALconfig.txt file to config.txt
• Do not replace the config.txt in the client's AyaNova folder on the server where AyaNova Data Portal is installed because that is the configuration file used by the Data Portal to run as well as any other AyaNova programs on this server. If you replace it, than the Data Portal itself won't run, neither will Generator nor Dataportal, etc
c. Edit this new config.txt using NotePad
• Do not use any other program but NotePad to edit this file
• Edit the example IP Address with the server's internal IP address and the port number for Data Portal
• For example, if your server's internal IP address is 192.168.1.100, and the port the client's Data Portal site is using is 6969, that config.txt would look like

<ConnectionType>DataPortal</ConnectionType>
<PortalServer>http://192.168.1.100:6969/AyaNovaDP/DataPortal.rem</PortalServer>
• Save the file
d. On an existing local area networked computer that has AyaNova already installed and connecting to the network AyaNova database, do the following:
• Make sure that local area networked computer is exited out of the AyaNova program
• Rename their config.txt in their AyaNova program folder to config.txtnetwork
• Paste into their AyaNova folder the above edited config.txt file
• Run AyaNova on this local area networked computer and confirm can log into AyaNova successfully, and am connecting by data portal by checking Help -> About AyaNova
e. If not successful:
• Recheck your steps and reconfirm the details
f. Once successful - exit out of AyaNova on that local area networked computer
g. Now edit that config.txt again, this time you will be testing to ensure connection via the external router/firewall but still from within your local area network
2. Test connection to client's AyaNova database via local area network connection computer and external IP address and port:
a. Edit the config.txt on that local area networked computer again using NotePad
b. Edit the example IP Address with the router's external IP address and the port number (should be the same port number you set for this client's Data Portal site)
• For example, if your router's public IP address is 222.333.111.6, and the port the client's Data Portal site is using is 6969, that config.txt would look like
c. Save the file
d. Run AyaNova on this local area networked computer and confirm can log into AyaNova successfully, and am connecting by data portal by checking Help -> About AyaNova
e. If not successful:
• Recheck your steps and reconfirm the details
f. Once successful - exit out of AyaNova on that local area networked computer and restore the config.txt back to the regular config.txt for local area network access
• delete that testing config.txt as no longer needed
• rename the config.txtnetwork back to config.txt
g. Once successful, continue to the next step
3. Provide configuration for remote computer now that internal local area connection is confirmed working:
a. Move to the client's AyaNova examples folder on this Data Portal server
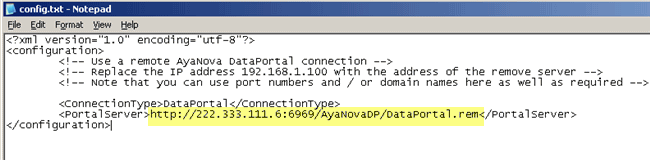
b. Edit that config.txt using NotePad again
• Do not use any other program but NotePad to edit this file
• Edit the example IP Address with the router's external IP address and the port number
• For example, if your router's public IP address is 222.333.111.6, and the port the client's Data Portal site is using is 6969 (which is also the same port you configured in the router/firewall and for AyaNovaDP), that config.txt would look like
<ConnectionType>DataPortal</ConnectionType>
<PortalServer>http://222.333.111.6:6969/AyaNovaDP/DataPortal.rem</PortalServer>
• Save the file
d. Make that config.txt file accessible to your remote user - either give that config.txt file to your remote user by email or put it on a disk, etc and have them save to a folder on their local hard drive
• For example, have them save it to their C:\Temp
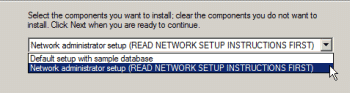
e. Have your remote user download the AyaNovaSetup.exe installation file and save to their local hard drive into that same folder
• So now that folder has both the AyaNovaSetup.exe file and the special config.txt file.
f. Have that remote user run the AyaNovaSetup.exe file from that folder location that also has the edited config.txt in that same shared location.
• Make sure the remote user selects AyaNova - Networked computer installation
The AyaNovaSetup.exe will "see" that config.txt file that is in the same folder with it, and automatically copy the config.txt to that computer's AyaNova program directory so no additional configuration is needed on that user's station.
The install will only install the AyaNova program files it has been told to install, will copy that config.txt file to the remote user's local hard drive workstations AyaNova program folder and will not install a trial database.
The AyaNova installation will place a desktop icon for AyaNova on the desktop as well as in the start menu.
NOTE: you may also want to set these additional rights settings so that external users can not view the contents of the config.txt file
1. Open the IIS Manager or Computer Management
2. Right-click on config.txt that is within the folder of the AyaNovaDP site for this client
3. Select Properties of this config.txt file via the IIS Manager
4. Un-check the Read right, and save.
If an issue with the Data Portal, you first need to confirm at what point an issue first occurs. This means the first thing you do is re-check every step - also refer to the Data Portal configuration steps in the AyaNova Help file.
If continue to experience an issue, check the AyaNova Support Forum for a solution similar to your issue
If continue to experience an issue, either post the following on the AyaNova Support Forum or send via direct email to AyaNova support:
• Identify the issue you are having and what step it relates to - provide details of what exactly was done each step, possibly screenshots etc of the issue
• Confirm each step taken up to the point of the issue providing details on each of those steps
• If issue in remote computer configuration, identify step at and config.txt with that step along with confirmation of testing steps done previously to that point