A. Test .NET connection on the server itself
B. Test connectivity from within the local area network
C. Test connection from outside of the network (connecting over the internet)
A. Test the connection via the data portal by opening Internet Explorer on this server where you have just performed the steps above, and typing in the URL where XXXX is the port number of your Default Web Site
http://localhost:XXXX/AyaNovaDP/DataPortal.rem?wsdl
and also test using the ip address of the server itself (where xxx.xxx.xxx.xxx is the private ip address of this server)
http://xxx.xxx.xxx.xxx:XXXX/AyaNovaDP/DataPortal.rem?wsdl
•For example, in the screenshot below, the port is 6969 so the URL and the private ip address of this server is 192.168.1.100 so the URL is http://192.168.1.100:6969/AyaNovaDP/DataPortal.rem?wsdl
•When using Internet Explorer, you will and you do want to see similar to below:

•All this is confirming, is that .NET is working correctly with your Data Portal. And is the most basic requirement.
•If you see similar to the screenshot above, then continue to the next step. If not, recheck all of your steps from the start.
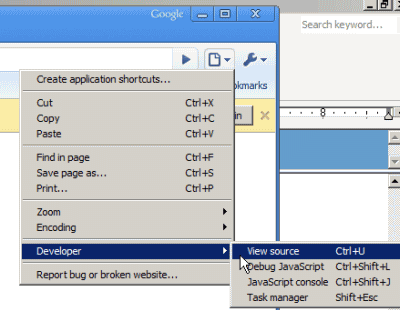
•Note that not all web browsers for example such as Google Chrome may show the above unless you select its Control the current page -> Developer -> View source; and Opera won't show anything at all. Use Internet Explorer to perform this step.
B. Test connectivity from within the local area network
a. on a networked computer within the local area network, open a web browser and enter in the local ip of the server, the port number for the dataportal etc as below
http://dataportalserverlocalip:XXXX/AyaNovaDP/DataPortal.rem?wsdl
for example, if the local ip of the dataportal server was 192.168.1.100; and the port number you set for it was 6969, you would enter in:
http://192.168.1.100:6969/AyaNovaDP/DataPortal.rem?wsdl
•You do want to see similar to below:
•if you do not see as above, that means either one or more of the following is a problem and you need to recheck your steps:
•the data portal site is not running - check your IIS manager
•a firewall may be blocking access
•you did not enter in the correct local ip of the data portal server
•you did not enter in the correct port number for the data portal
•you did not enter in the correct URL
b. once you have confirmed connectivity from within the local area network, then continue
c. Make a copy of the EXAMPLE_DATAPORTALconfig.txt from the C:\Program Files (x86)\Ground Zero Tech-Works Inc\AyaNova\Examples folder on the server
d. Move to the C:\Program Files (x86)\Ground Zero Tech-Works Inc\AyaNova/examples folder on your Data Portal server
e. Make a copy of the EXAMPLE_DATAPORTALconfig.txt file and rename that copy to config.txt
When you initially installed AyaNova onto your server selecting the default installation, it installed a number of example config files and the example snapshot batch file to the folder C:\Program Files (x86)\Ground Zero Tech-Works Inc\AyaNova\examples.
If you do not have the Examples folder:
•Are you running the latest version of AyaNova?
•Re-run the AyaNova installation again
•Do note that this will uninstall the AyaNova program (but not your database) and then install again, so if you had previously installed the AyaNovaDP and Network Generator, do check to see if you need to install those again after.
•Be sure to click on No when it asks to overwrite your config.txt
f. Edit this config.txt using NotePad
•Do not use any other program but NotePad to edit this file
•Edit the example IP Address with the internal private IP address and the port number of the AyaNovaDP (this is the same ip address and port number you tested with above in B.a)
•For example, if your server's IP address is 192.168.1.104, and the port your Default web site is using is 6969 than config.txt would look like

<ConnectionType>DataPortal</ConnectionType>
<PortalServer>http://192.168.1.104:6969/AyaNovaDP/DataPortal.rem</PortalServer>
•Save the file
g. on a local area networked computer that was previously connecting to the networked AyaNova database, replace its existing config.txt with this testing config.txt
h. Now run AyaNova
i. Confirm that you can load AyaNova
j. what this is doing is confirming that you can connect within your internal network running the dataportal.
If you can not connect and get an error, check the following:
•the data portal site is not running - check your IIS manager
•a firewall may be blocking access
•you did not enter in the correct local ip of the data portal server
•you did not enter in the correct port number for the data portal
•you did not replace the existing config.txt file
k. After have confirmed can connect, replace the testing config.txt with the correct local area network config.txt you were using before.
C. Test connection from outside of the network
a. on a remote computer connected to the Internet, open a web browser and enter in the public external ip of the router/firewall, the port number for the dataportal etc as below
http://publicexternalip:XXXX/AyaNovaDP/DataPortal.rem?wsdl
for example, if the external public ip of your router is 222.333.66.23; and the port number you set for it was 6969, you would enter in:
http://222.333.66.23:6969/AyaNovaDP/DataPortal.rem?wsdl
•You do want to see similar to below:
•if you do not see as above, that means either one or more of the following is a problem and you need to recheck your steps:
•the router/firewall may not be configured for port forwarding correctly - recheck your router/firewall help
•the data portal site is not running - check your IIS manager
•a router/firewall may be blocking access
•you did not enter in the correct local ip of the data portal server
•you did not enter in the correct port number for the data portal
•you did not enter in the correct URL
b. once you have confirmed connectivity from outside of the local area network, then continue
C. Provide configuration for remote computer
a. Move to the C:\Program Files (x86)\Ground Zero Tech-Works Inc\AyaNova/examples folder on your Data Portal server
b. Make a copy of the EXAMPLE_DATAPORTALconfig.txt file and rename that copy to config.txt
c. Edit this config.txt using NotePad
•Do not use any other program but NotePad to edit this file
•Edit the example IP Address with the router's external IP address and the port number (that you configured in step 1 for your router/firewall that is the same in the Default Web Site and also performed in the step C.a just above)
•For example, if your router's public IP address is 222.333.111.6, and the port your Default web site is using is 6969 (which is also the same port you configured in the router/firewall and for AyaNovaDP), that config.txt would look like
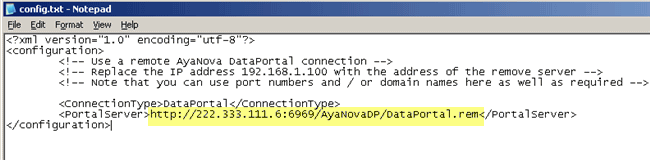
<ConnectionType>DataPortal</ConnectionType>
<PortalServer>http://222.333.111.6:6969/AyaNovaDP/DataPortal.rem</PortalServer>
•Save the file
d. Make that config.txt file accessible to your remote user - either give that config.txt file to your remote user by email or put it on a disk, etc) and have them save to a folder on their local hard drive
•For example, have them save it to C:\Temp
e. Have your remote user download the AyaNovaSetup.exe installation file and save to their local hard drive into that same folder
•For example, the C:\Temp folder will now have both the AyaNovaSetup.exe file and the special edited config.txt file.
f. Have that remote user run the AyaNovaSetup.exe file from that folder location that also has the edited config.txt in that same shared location.
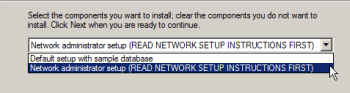
•Make sure the remote user selects Network administrator setup
The AyaNovaSetup.exe will "see" that config.txt file in the same folder and automatically copy it to that computer's AyaNova program directory so no additional configuration is needed on that user's station.
The install will only install the AyaNova program files it has been told to install, will copy that config.txt file to the remote user's local hard drive workstations AyaNova program folder and will not install a trial database.
The AyaNova installation will place a desktop icon for AyaNova on the desktop as well as in the start menu.
g. Run AyaNova and confirm can log in. Also check the Help -> About AyaNova and you can see there the configuration used to connect.