It is always recommend to read through all instructions first before proceeding.
A. IIS (Internet Information Services) is installed on the computer you want to run MBI on
B. AyaNova is networked and is the latest version.
C. AyaNova is installed on this computer and successfully runs
D. Run the AyaNova MBI setup file to install MBI files
A. Is IIS (Internet Information Services) installed on the computer you want to run MBI on?
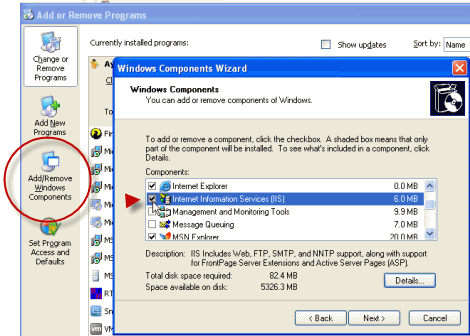
Install IIS by going to Add/Remove Windows Components and follow the on-screen instructions to install or add components to IIS if not already installed.
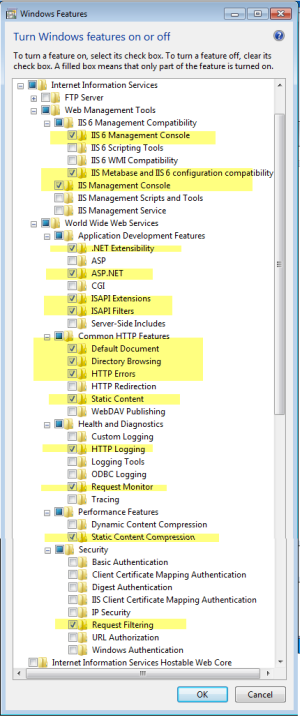
Below is example screenshot of all of the specific Internet Information Service settings that need to be checkmarked on a Windows 7 64bit operating system in order for MBI to function fully.
Below is example screenshot of adding IIS onto an older OS such as XP 64 via Add/Remove Windows Components
•Once installed, run Windows Updates again and apply all recommended updates
•Reboot again and check Windows Updates again, before proceeding with the installation.
B. Confirm that your AyaNova is networked and is the latest version.
•AyaNova must be networked using either Firebird Server, SQL Express or SQL Server. MBI will not run if using the default stand-alone installation of AyaNova.
•Refer to this AyaNova Help documentation section on networking AyaNova if you have not yet done so.

C. AyaNova is installed on to this computer and successfully runs
•Run AyaNova. Log in. Make sure you can log in successfully.
D. Run the MBI setup file and install
•Download the AyaNova MBI setup installation file from http://www.ayanova.com/download.htm and install MBI
•The installation will install MBI by default to C:\Program Files (x86)\Ground Zero Tech-Works Inc\AyaNovaMBI and set up a AyaNovaMBI site under the Default Web Site as shown in your IIS Manager
E. Once installation is complete, continue with configuration